Introduction
Thank you for your interest in the Writers Blog Pro WordPress Theme. We are delighted that you have selected our The Writers Blog ProWord Press Theme for your website.
The Writers Blog Pro theme is a simple, flexible, and fully responsive WordPress theme designed for business websites.
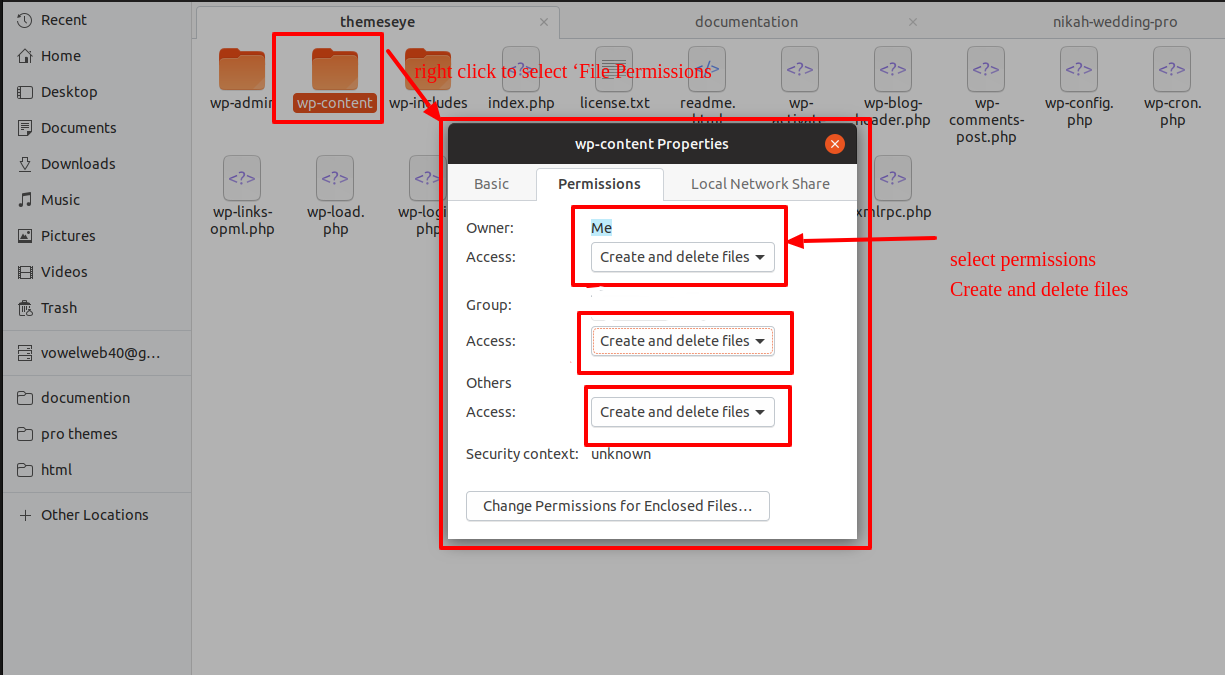
My site was working fine before? Who changed the File Permissions?
Incorrect file permissions may prevent WordPress from creating folders, uploading images, or running certain scripts.
WordPress requires server permissions to manage files and create folders.
- Then, select all folders in the root directory and right-click to select 'File Permissions'.
- wp-config >> permissions dialog box >> click on checkbox read and write >> Click on the OK button to continue
- The same procedure should be followed for the wp-content folder.
This document was meticulously written with the goal of making it easy to understand for novice to advanced users or developers. This document is divided into three sections.
1) Getting Started : This section will be extremely beneficial for Quick Start and understanding how to setup theme.
2) Detailed Document : This section explains everything about the theme, including all of the settings.
3) Other : This section contains information about various items such as theme features and so on.
If you have any questions that go beyond the scope of this document, please contact us at[email protected]
- Email: [email protected]
TE Key Activation
The TE Key Activation procedure is as follows.
As you will get the License Key on your Email, use that key to Activate License.
Follow the following Process to Activate License.
Go to the >>Dashboard>>Appearance >>TE Key Activation>>Enter Key>>Save Changes.
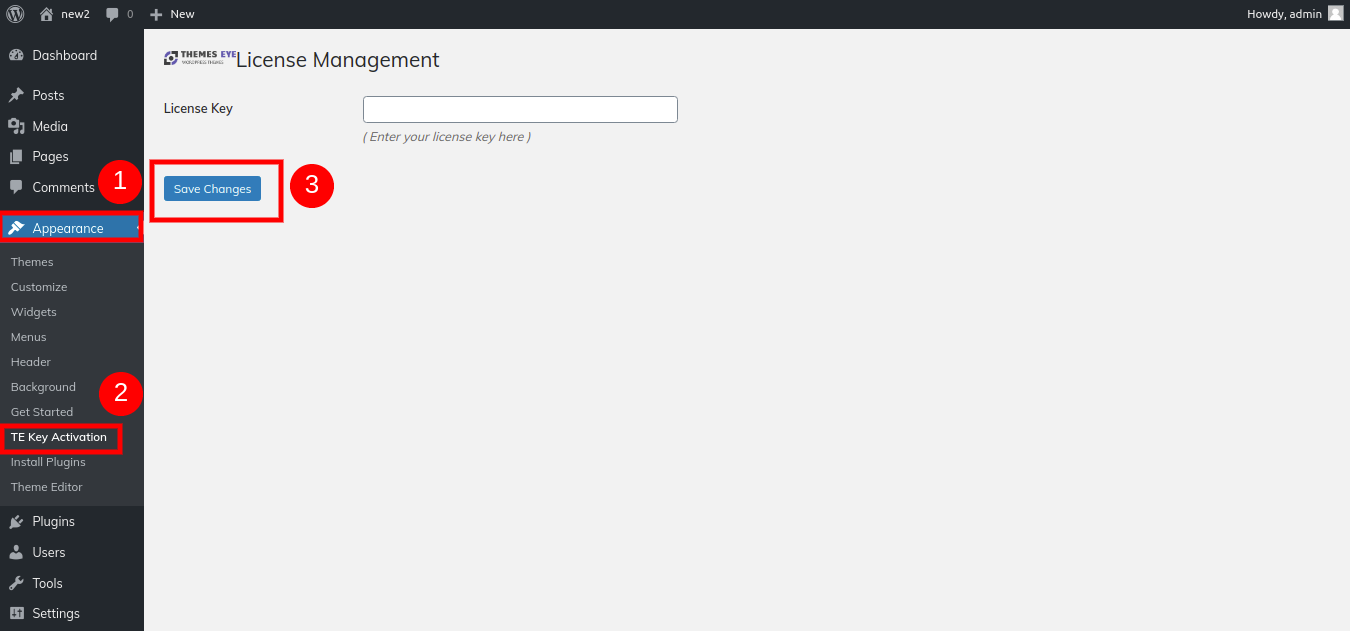
After Entering The Key >> Activate Licence.
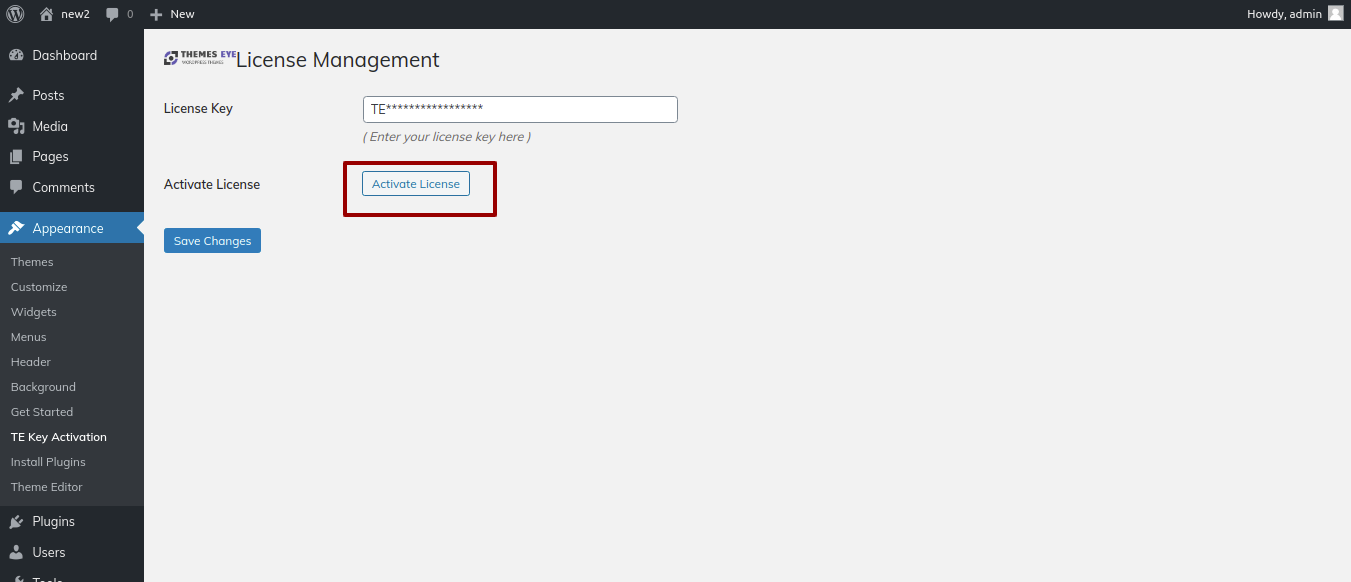
After you Activate Licence,the key will be active and then you can Getstarted with the Theme.
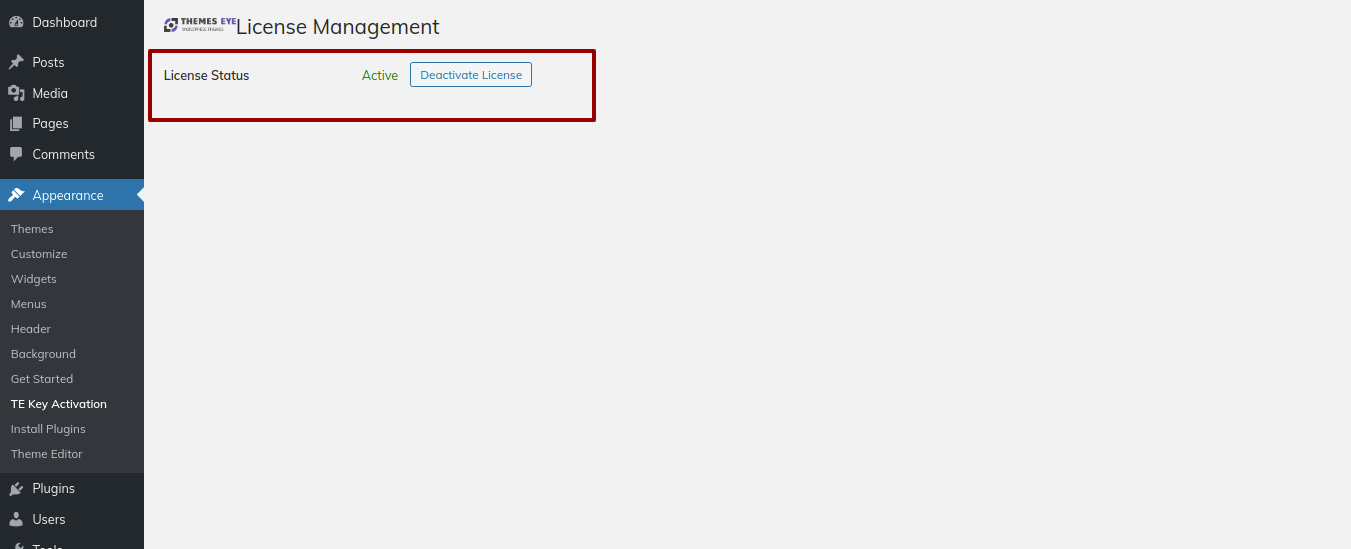
In this way you can activate your Licence Key.
You must have a working version of WordPress installed in order to install this theme. Please see the WordPress Codex for information on installing the WordPress platform.nbsp; https://codex.wordpress.org/Installing_WordPress
Step One : Installation Via WordPress Admin area
- Step 1 - Log in to your WordPress administration area.
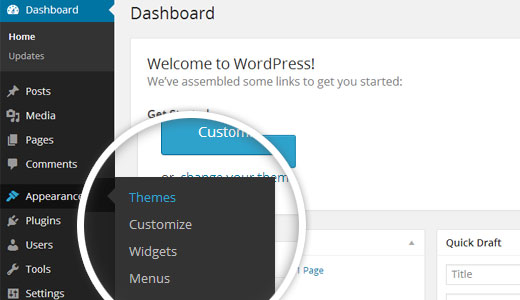
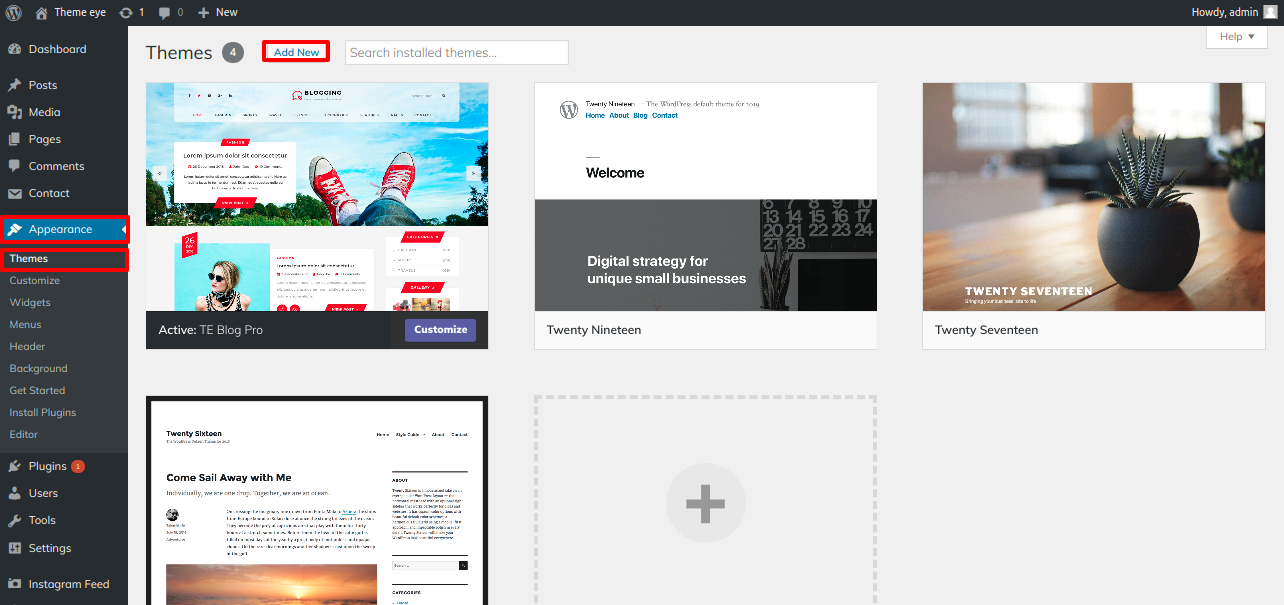
- Step 2 - Go to Dashboard >> Appearance >> Themes.
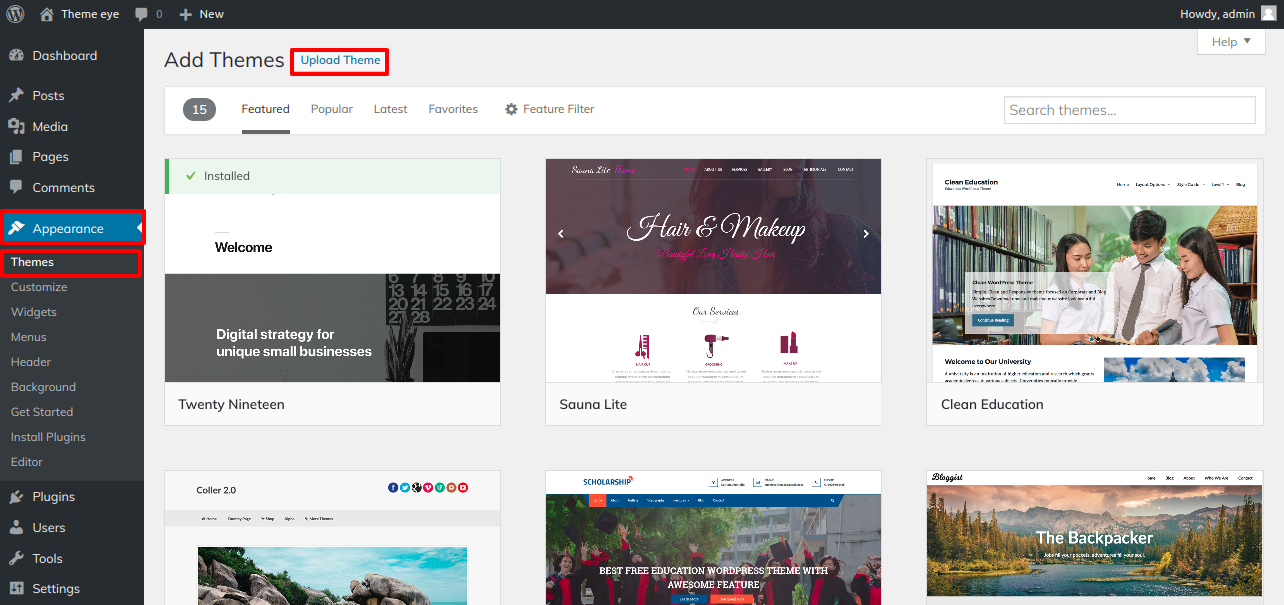
- Step 3 - Click on Add New Theme button at top.
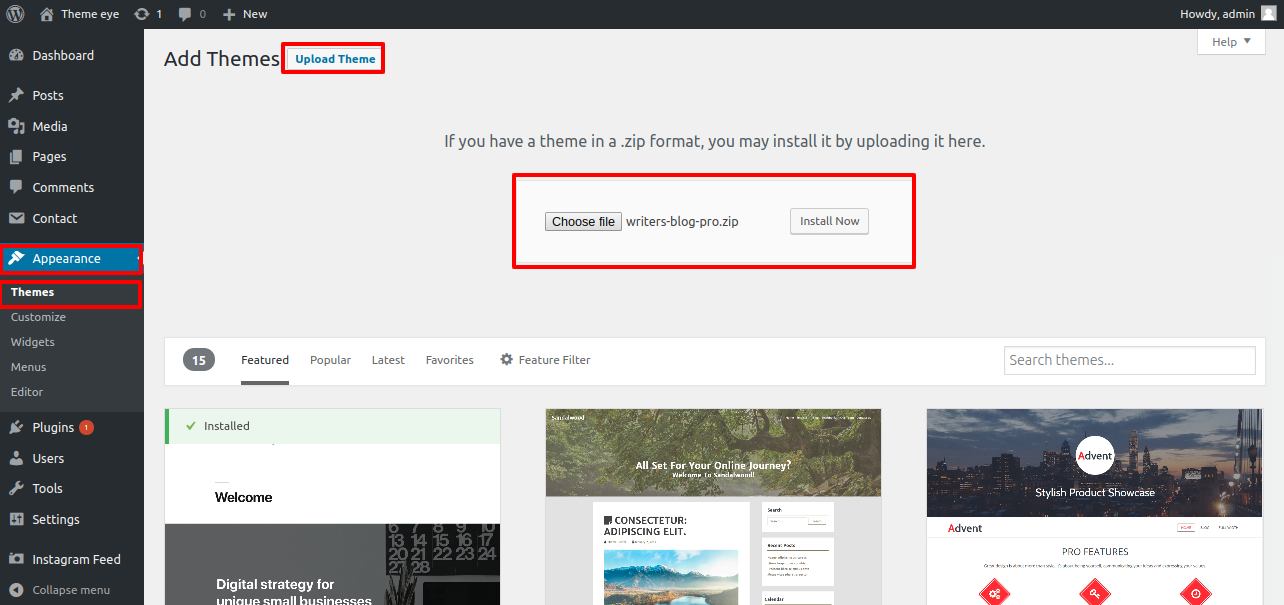
- Step 4 - Now, it Upload Theme button at top and upload.
- Step 5 - Select your the-writer-blog-pro.zip theme, then click the Install Now button.
Step Two : Installation Using FTP
- Step 1 - Download the-writers-blog -pro.zip file from your My Account ThemesEye.
- Step 2 - Extract Zip file.
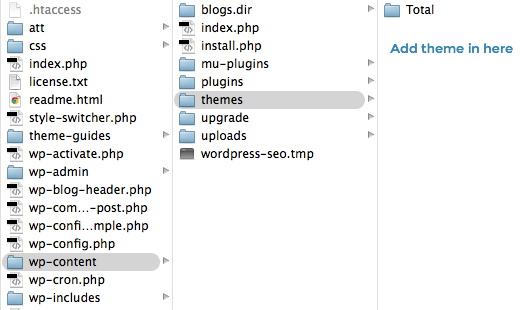
- Step 3 - Using your FTP program, upload the non-zipped theme folder into the "/wp-content/themes/" folder on your server.
- Step 4 - Go to Dashboard » Appearance » Themes and find The Writers Blog Pro theme from list
Demo Importer
Import demonstration content with a single click to get your theme up and running. This content will walk you through the process of creating a website.
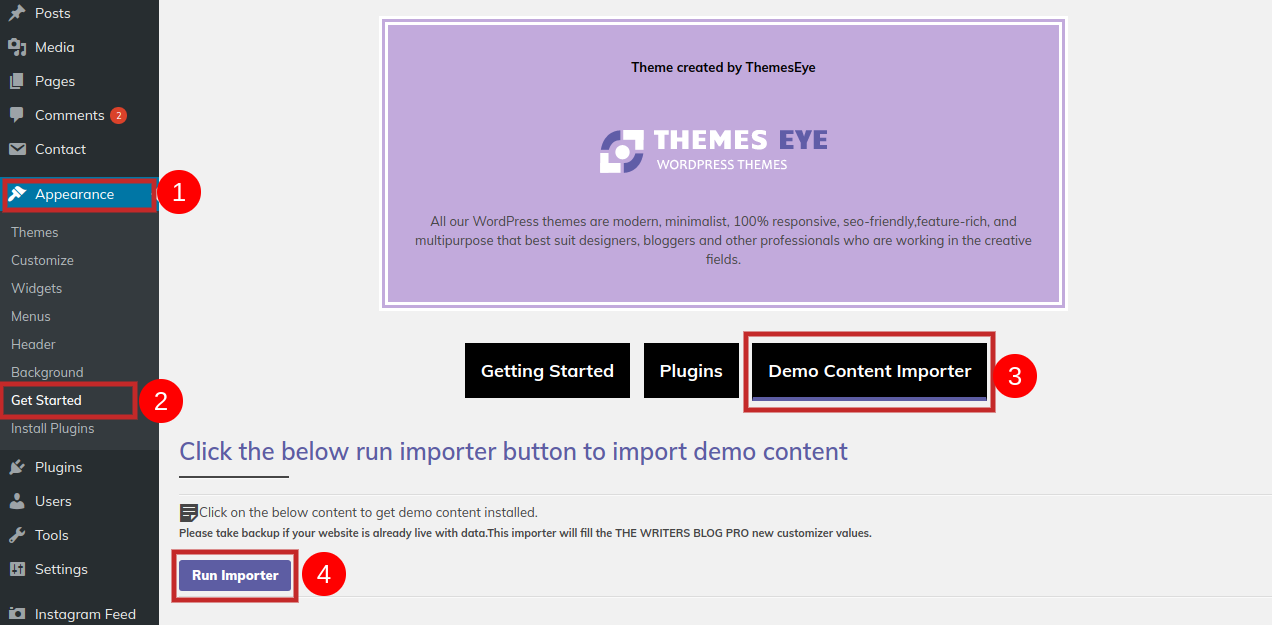
Go to Dashboard >> Appearance >> Get started
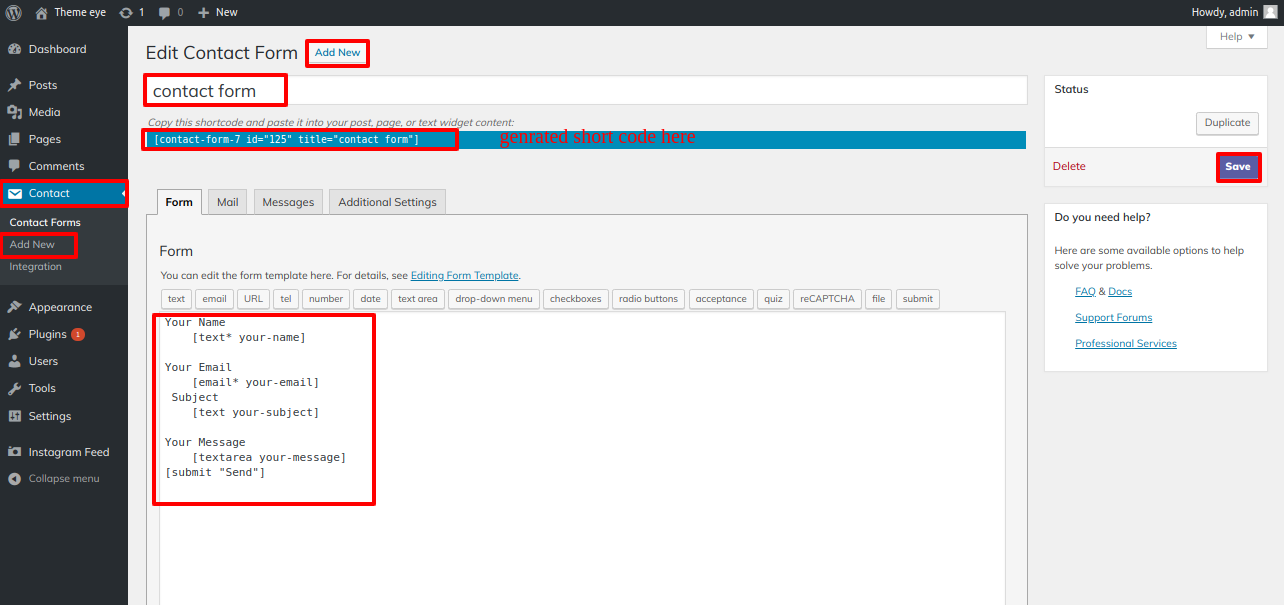
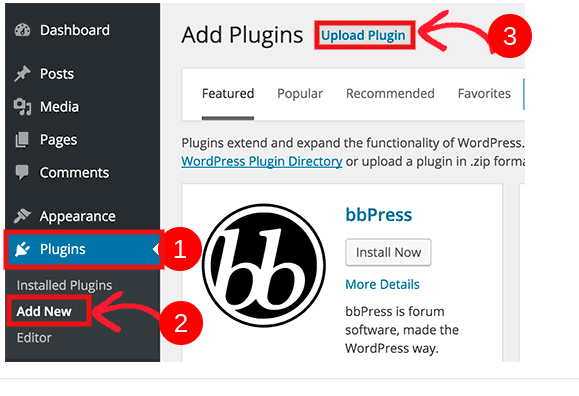
Before you can click "Run Importer," you must first install all required plugins, such as the contact-form-7 plugin.
Then, select "Demo Content Importer" and then "Run Importer."
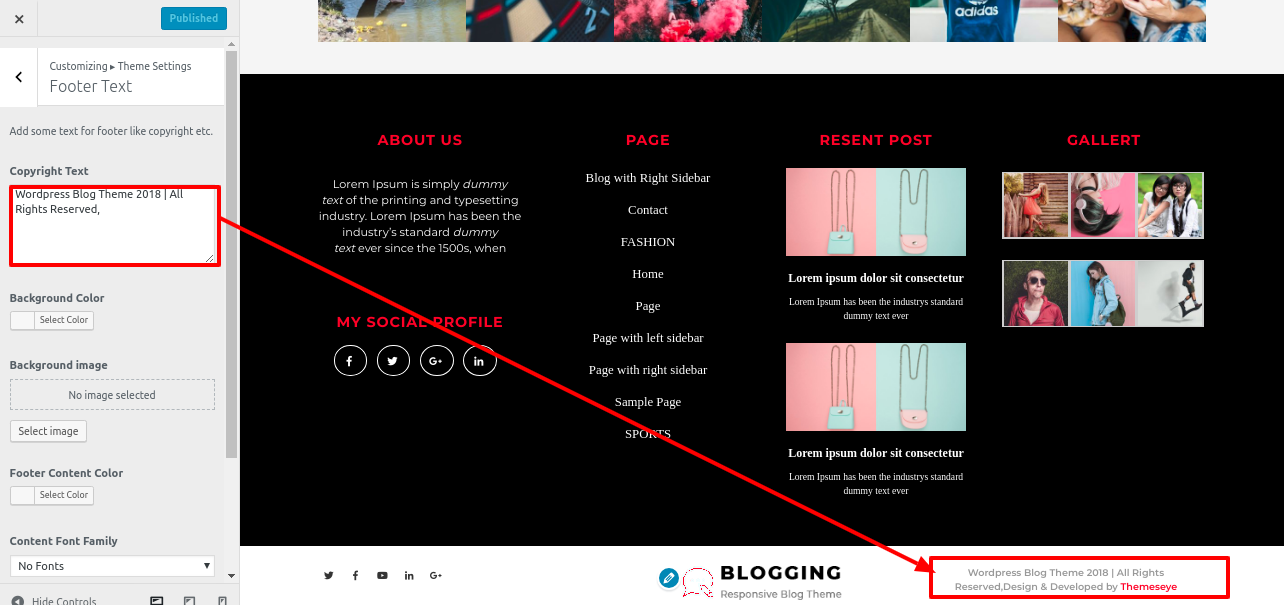
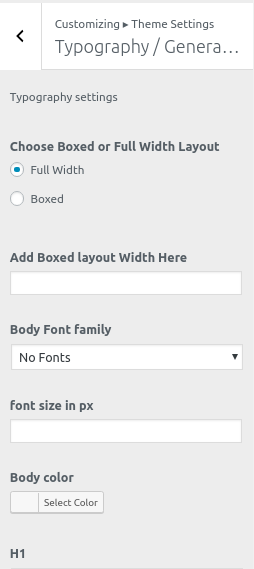
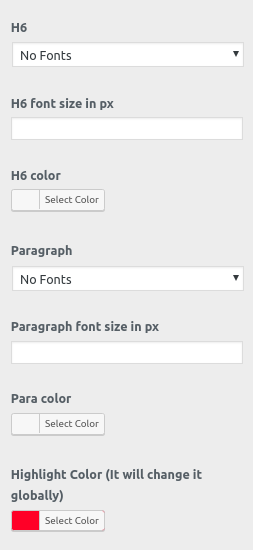
Color/Font Pallette
Color/font selection is a simple process. These options are available in all sections of the customizer. It is a complete image that demonstrates the colour and font palette. You can change the colour and fonts of the headings, paragraph, and buttons with a single click.
Depending on the number of options available in that section, each individual section has the option to set the colour palette for Headings, Title/Text, Paragraph, Button Text, and Button Background.
Home Page Section
Setup Home Page Template
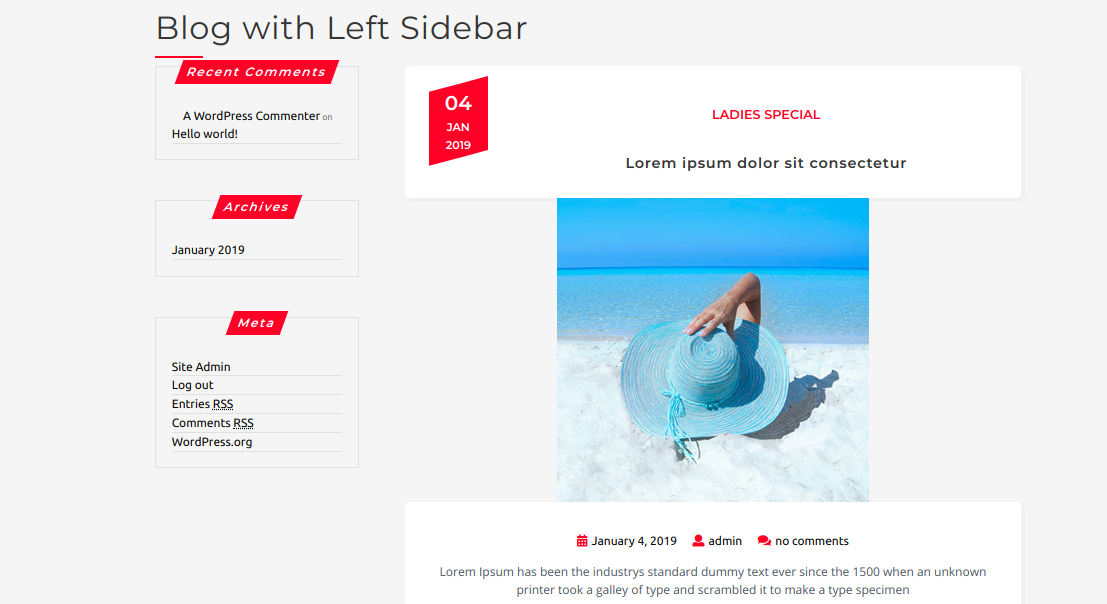
This section will assist you in organising your site's home page and other pages. This will also show you how to set up WordPress Menus, make a slider/banner, make a home page, use page templates, and insert shortcodes into pages.
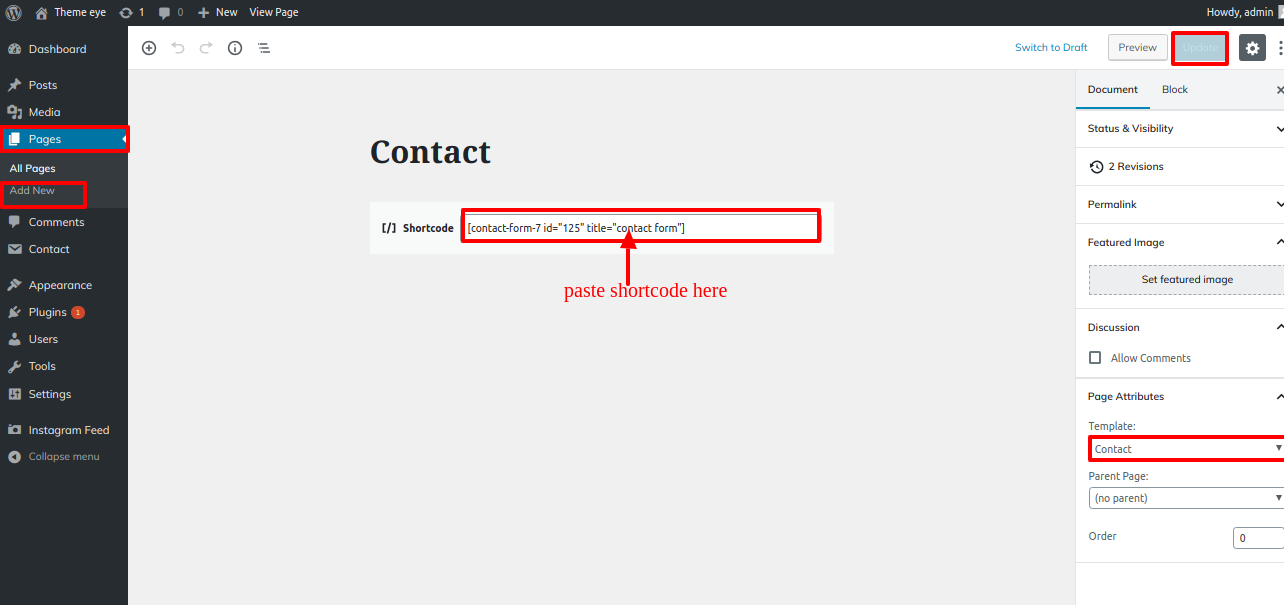
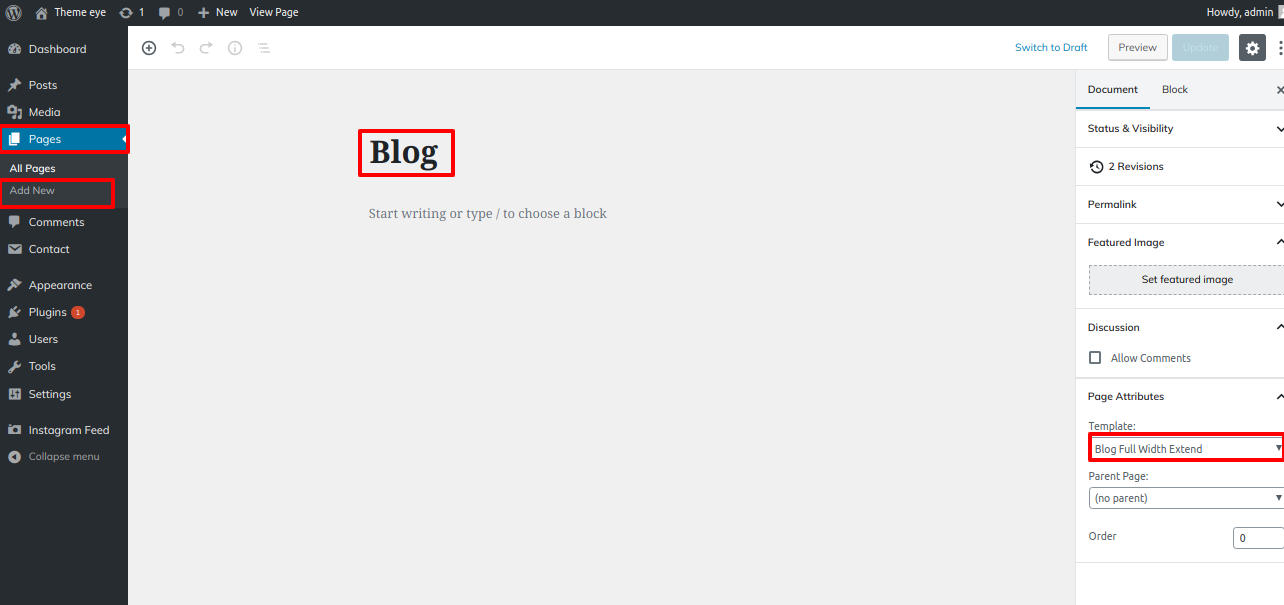
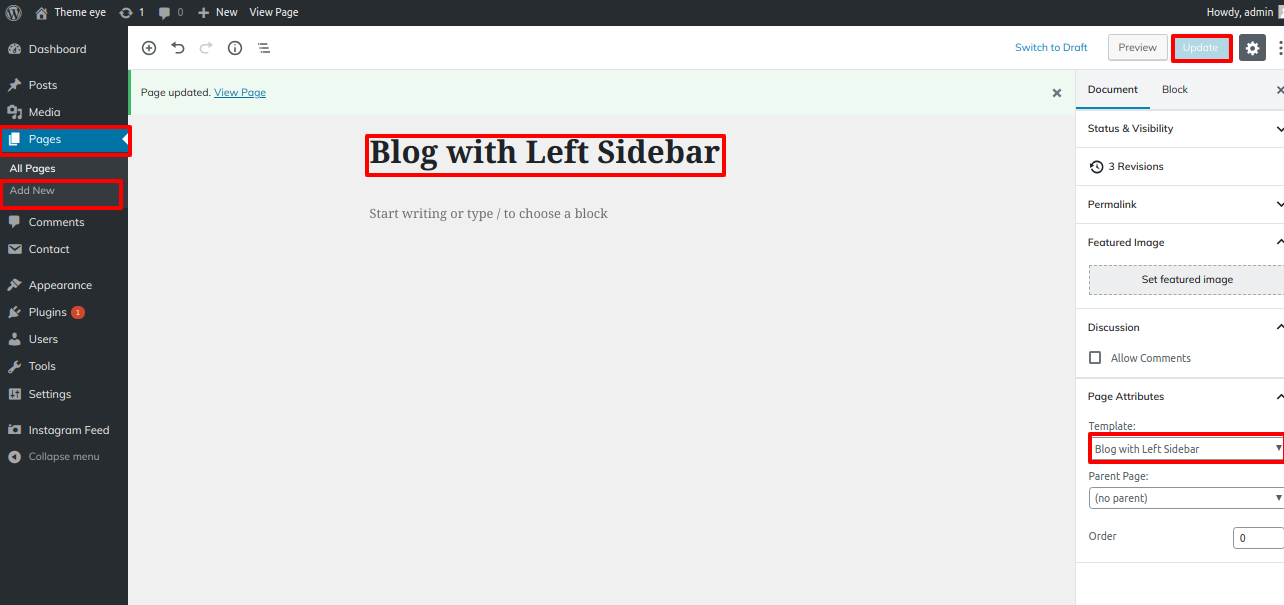
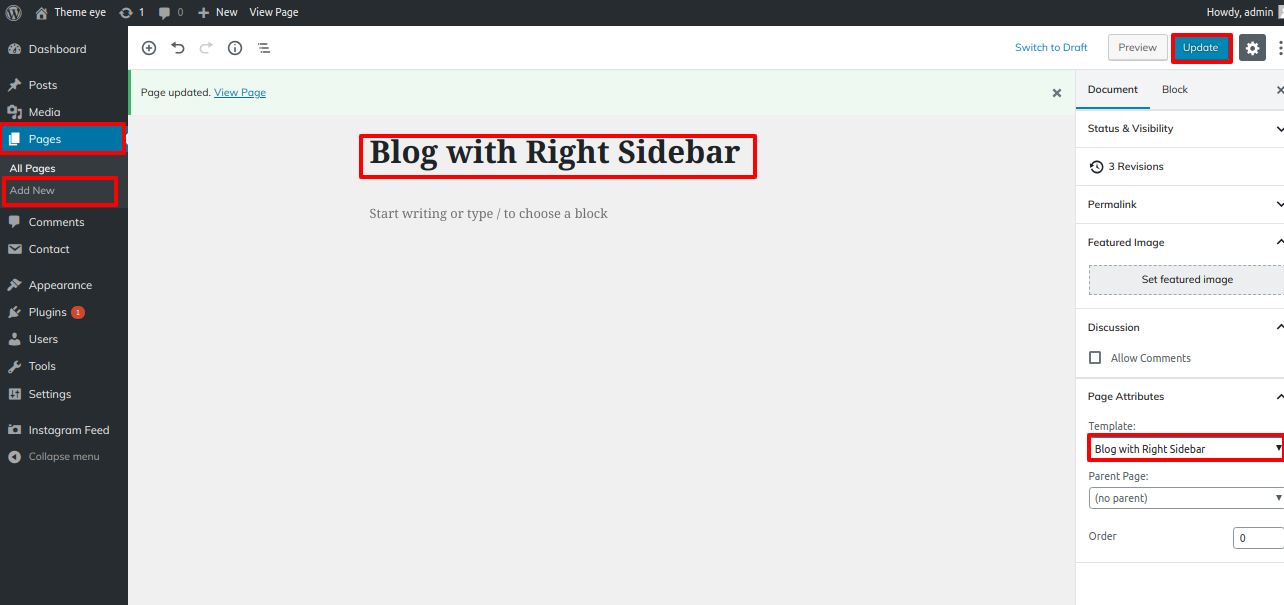
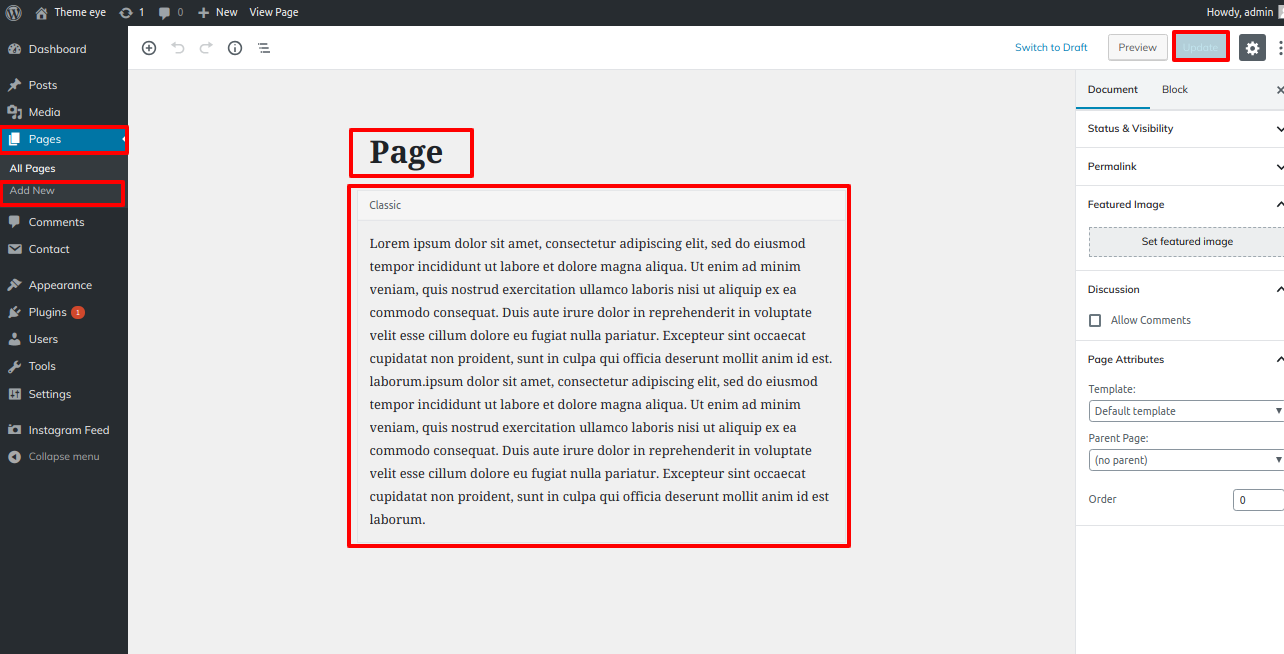
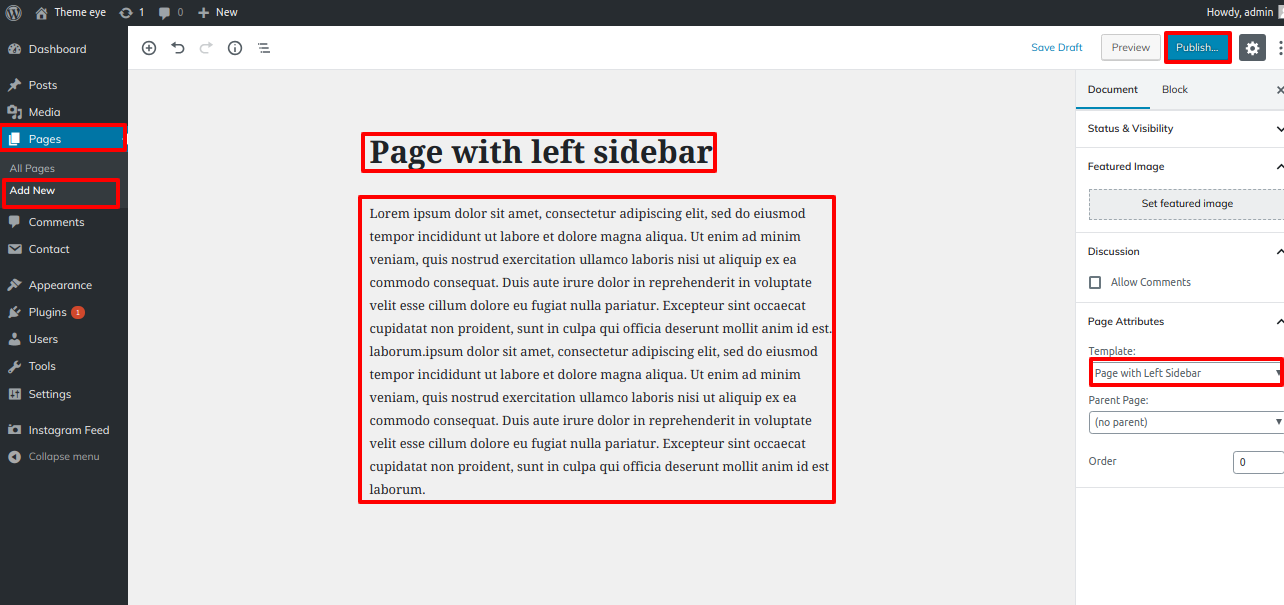
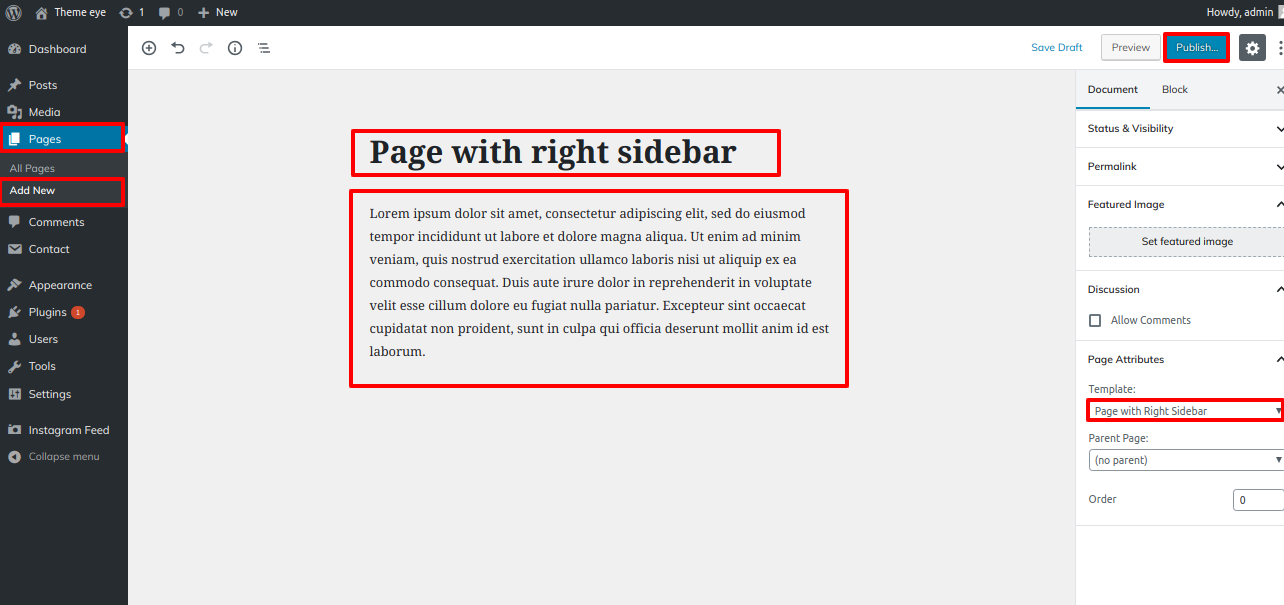
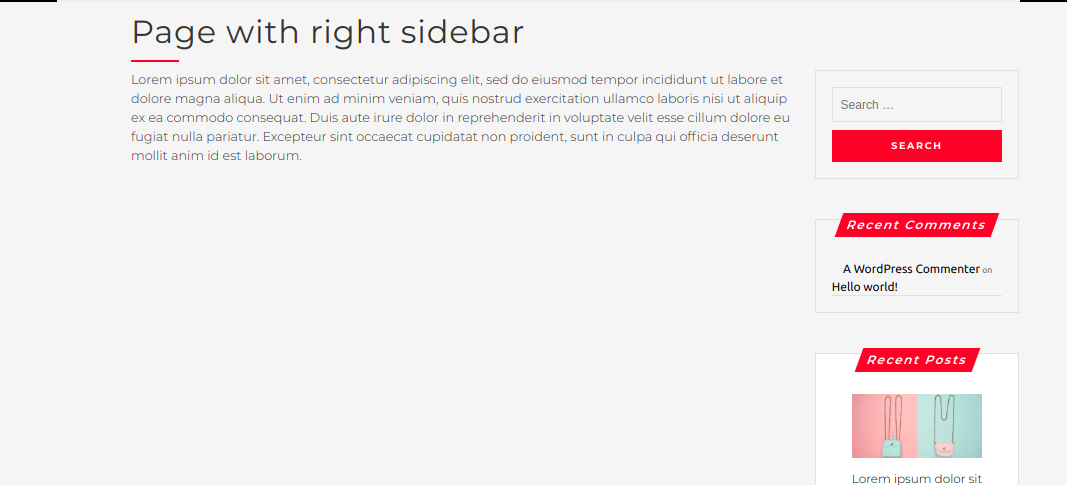
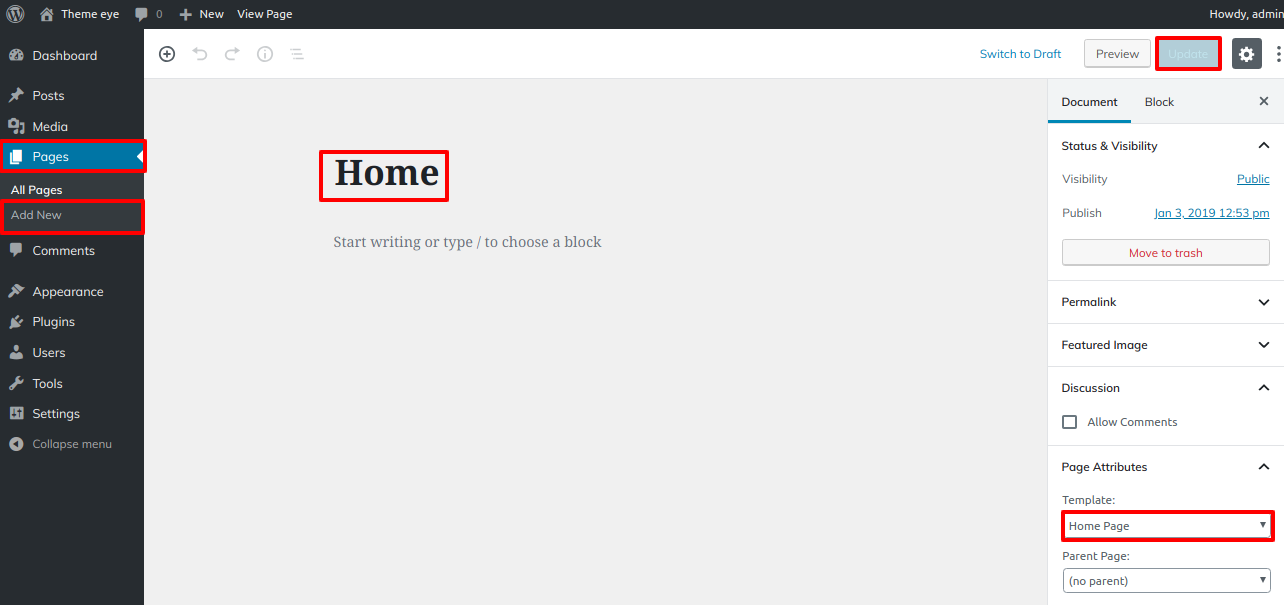
- Step 1 - Go to Dashboard >> Pages >> Add New, enter page name and select template as Home Page Template from Page Attribute as shown in below image
- Step 2 - Publish this page
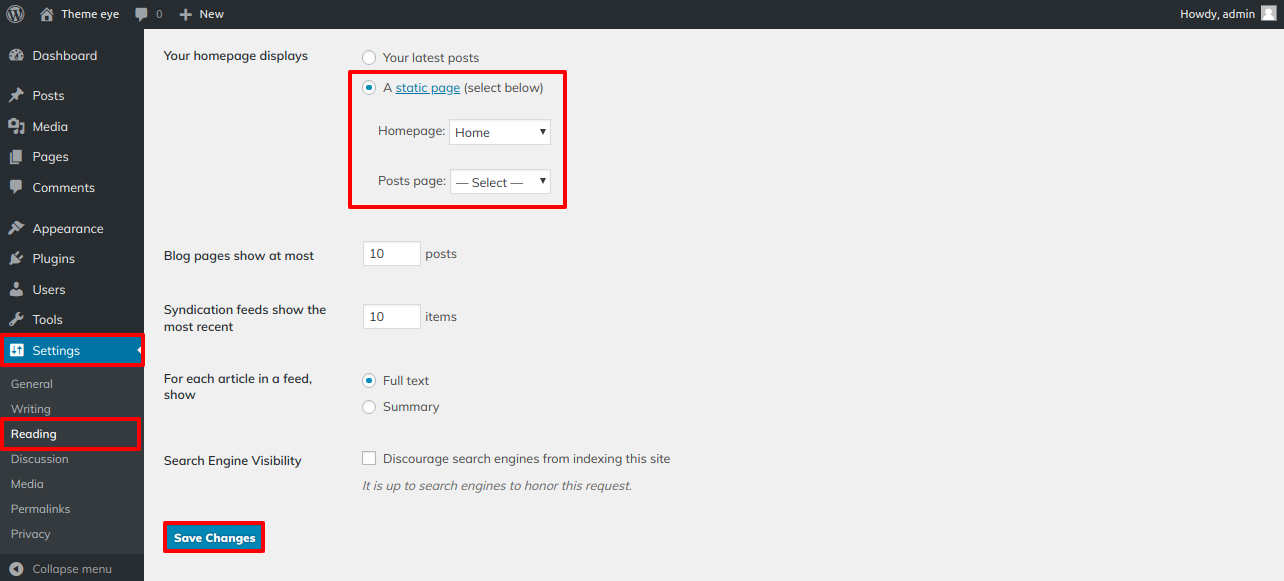
- Step 3 - Go to Dashboard >> Settings >> Reading, select home page as a front page
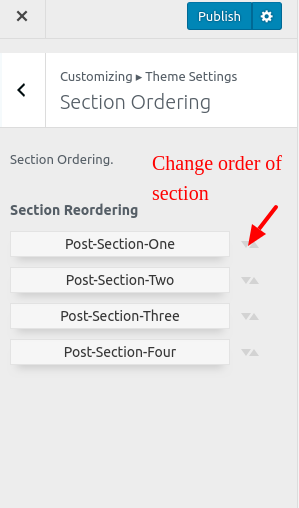
Section Ordering
How to Arrange and Reordering Section
Section reordering essentially means rearranging the section to meet our needs. To proceed with this section, drag the section to the top or bottom of the page where you want it. When you drag any section top or bottom, the front view changes based on the customizer values.
Section re-ordering is as simple as dragging and dropping options into any order you desire.
- Step 1 - Go to Appearance >> Customizing >> Theme Settings >>Section Ordering
In order to proceed with Section Ordering.
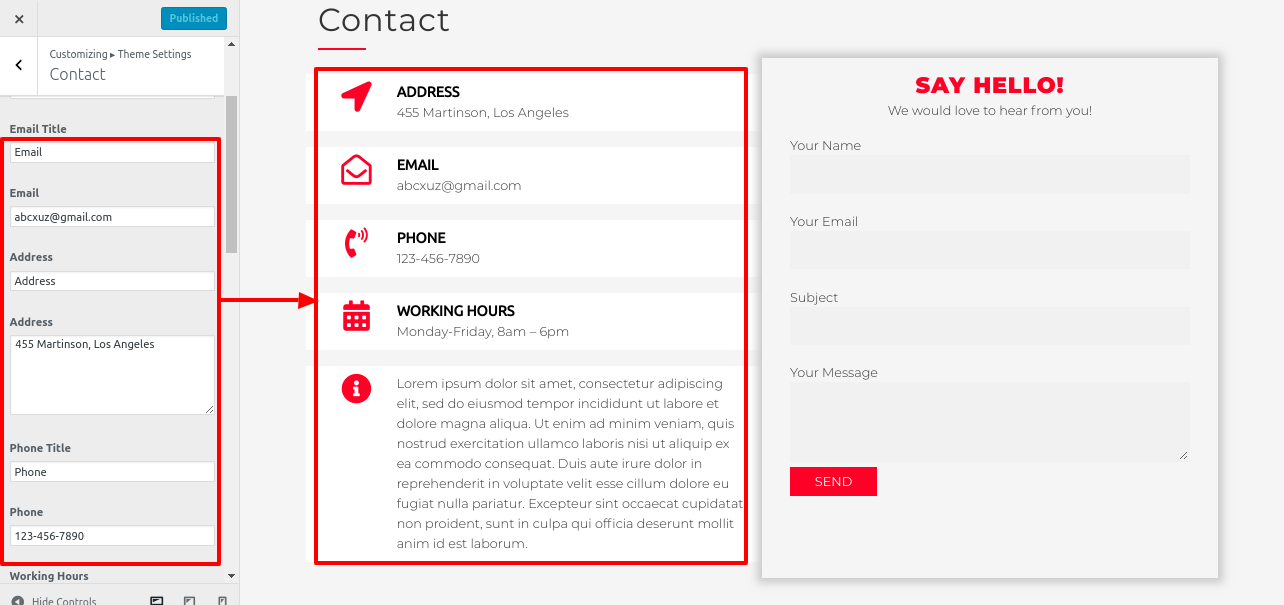
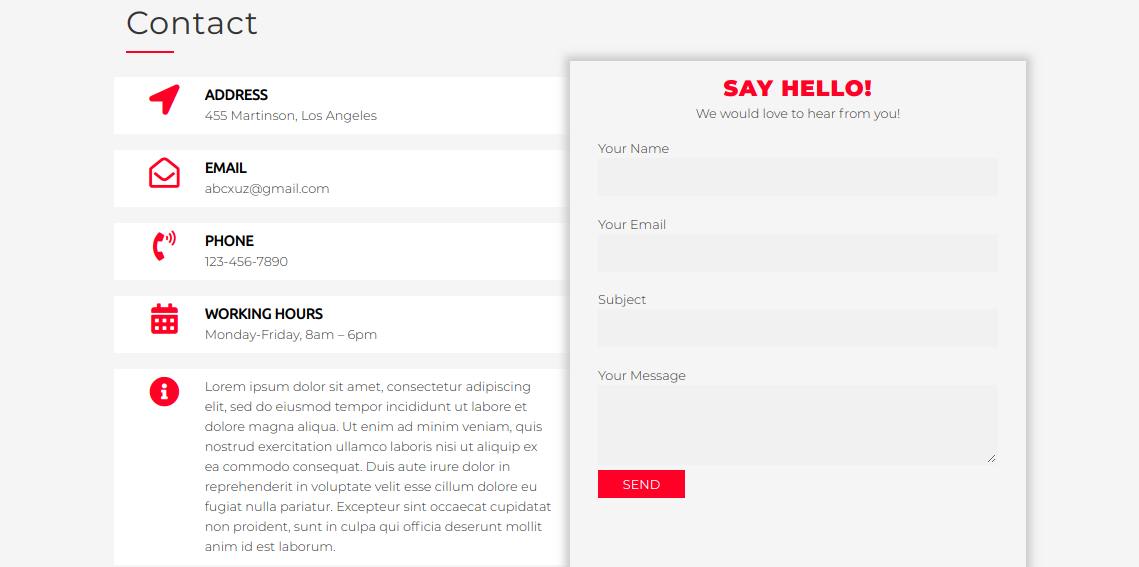
Header Setting
- Step 1 - Go to Dashboard >> >> Appearance >> Customizing >> Site Identity
- a. You can add logo from Select Logo button for set logo
- Step 2 Go to Dashboard >> Pages >> add new page with addition of image if you want to add and allot the page to that section. You can do this several times for creating multiple pages to allot in same section.
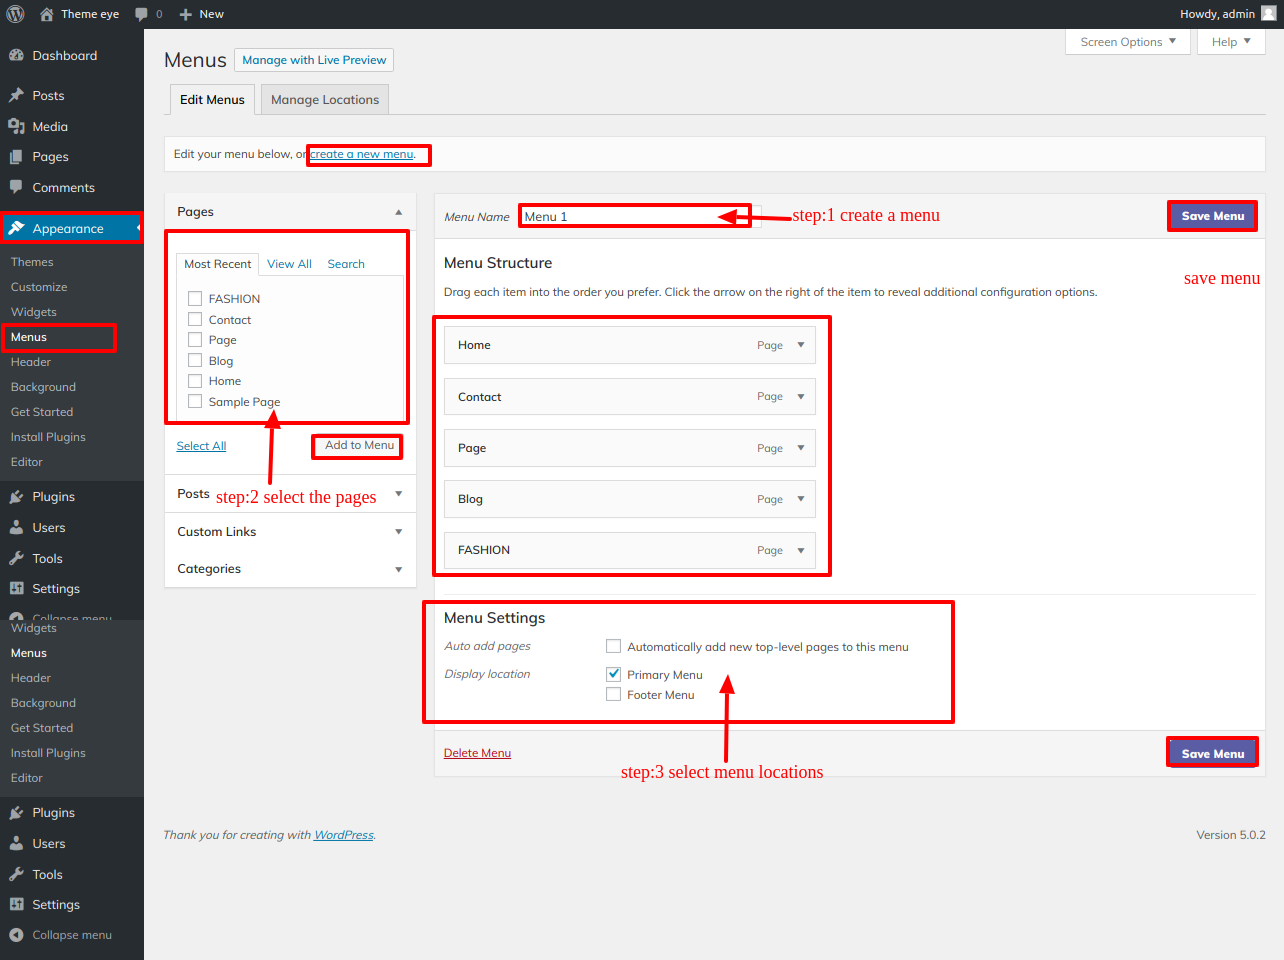
- Step 3 - Go to Dashboard >> Appearance >> Menus.
- Step 4 - Click on create a new menu as show in below image.
- Step 5 - Enter menu name and click on Create Menu as shown in below image.
- Step 6 - Select Pages like Latest Blog,Pages,About Us from left Side and click on Add to Menu button as show in below image
- Step 7 - After selecting pages select menu location and click on save menu.
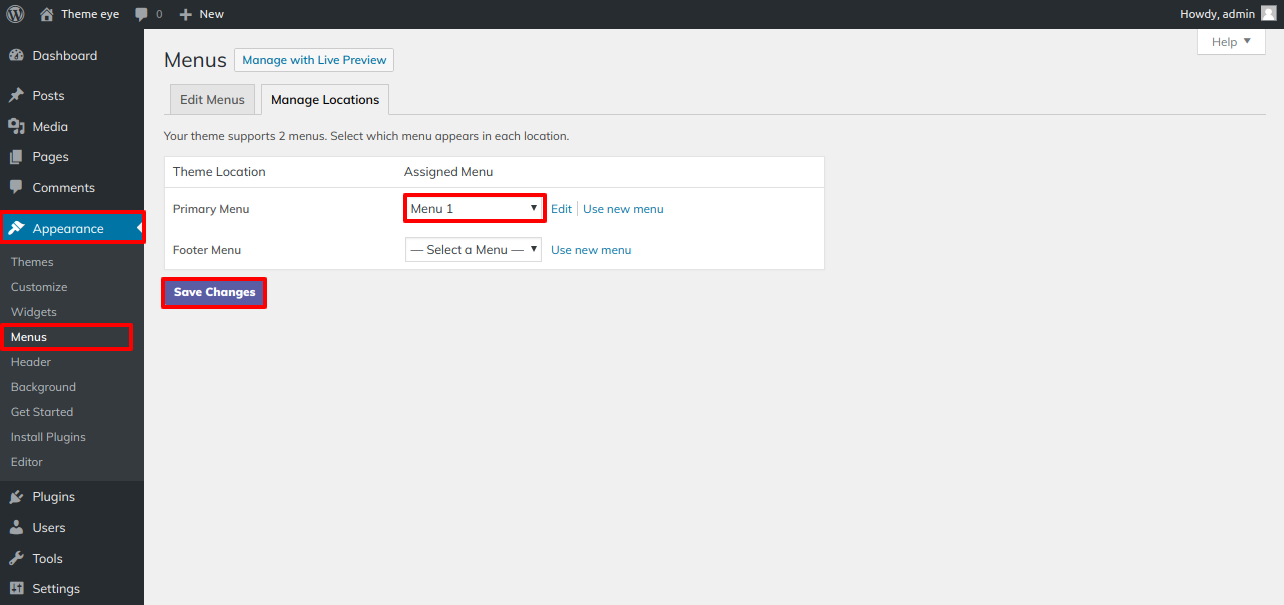
- Step 8 - Click on Manage Locations as show in below image.
- Primary Menu Front Preview

Final display of Header


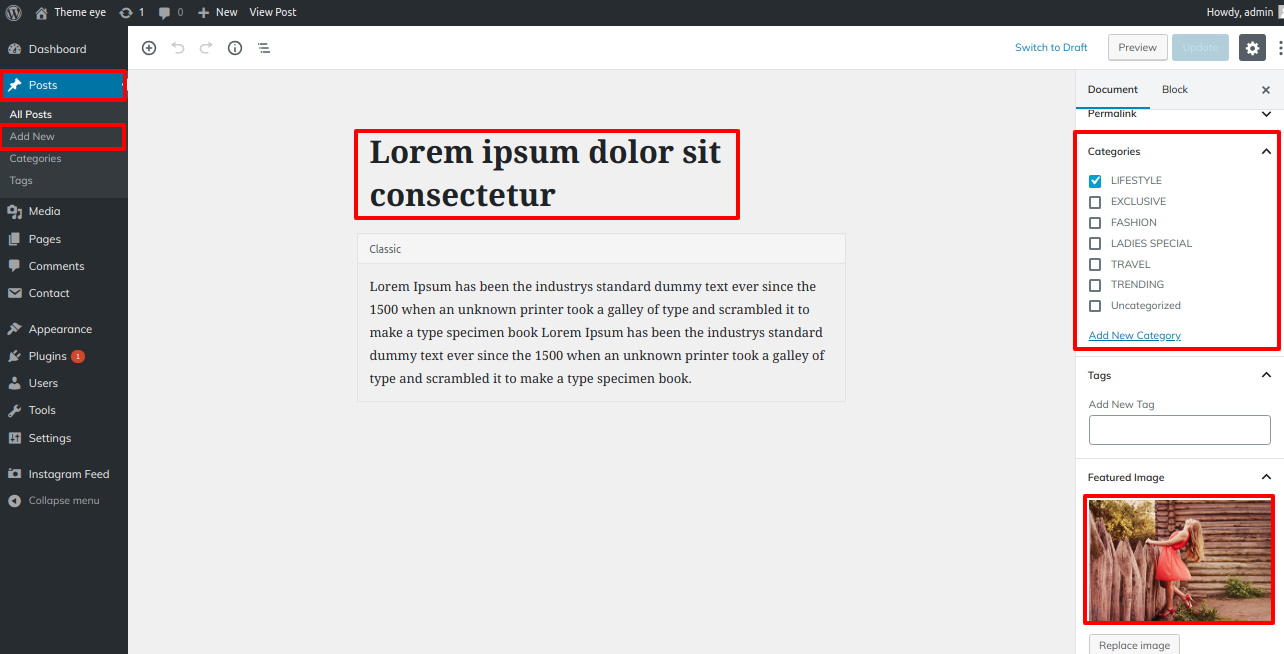
Setup Post section One Section
Follow the steps below to set up the Post Section One Section.
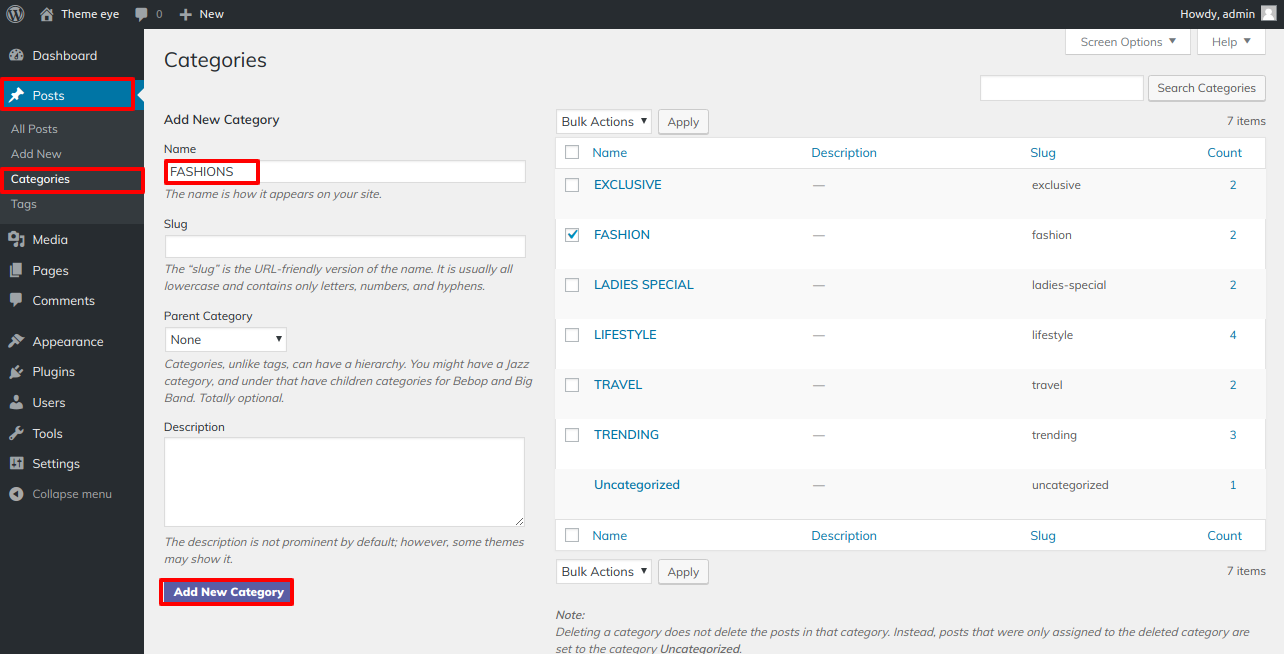
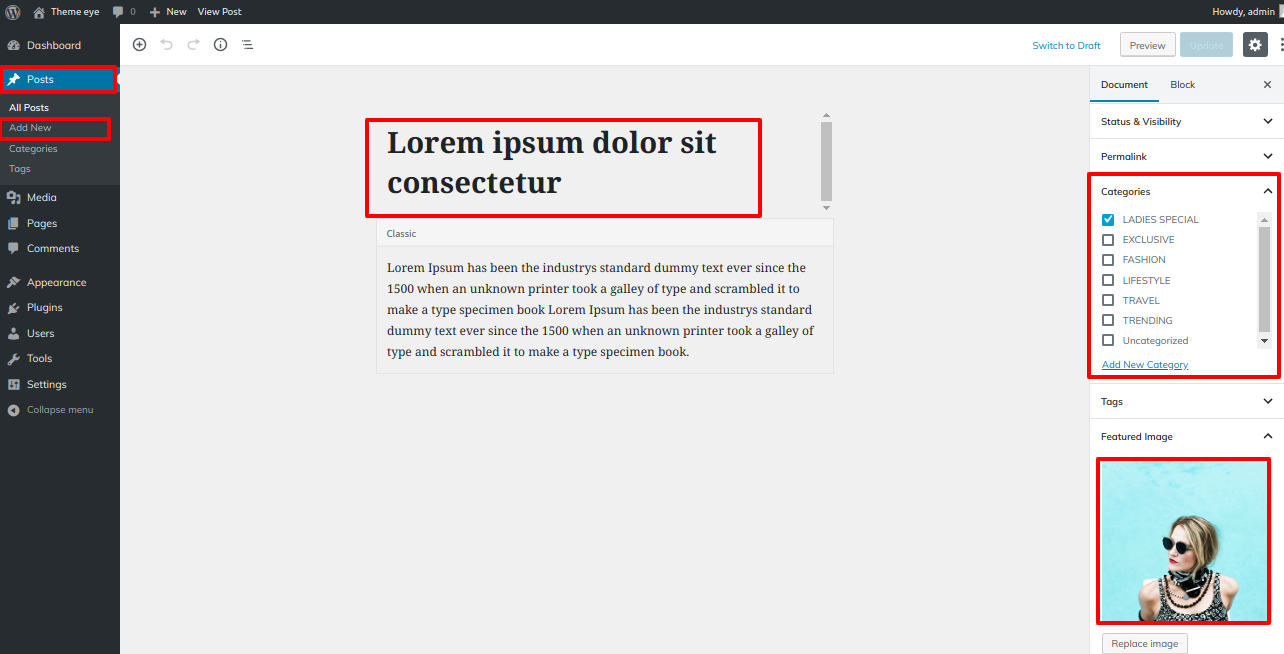
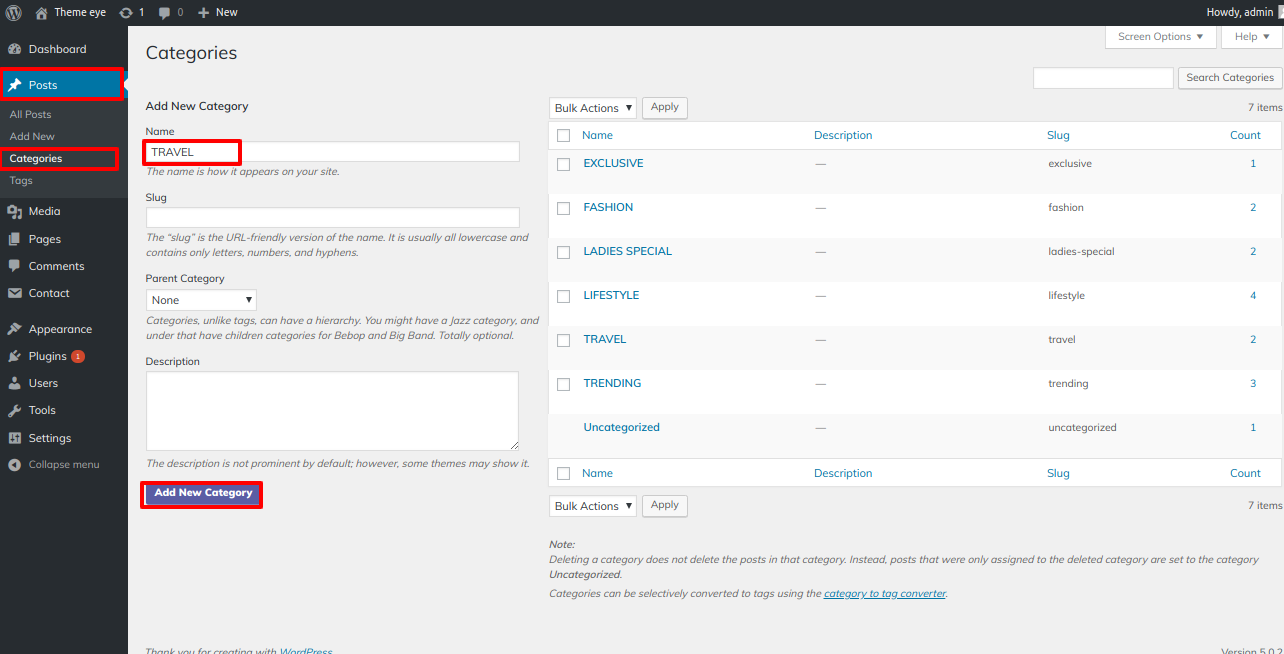
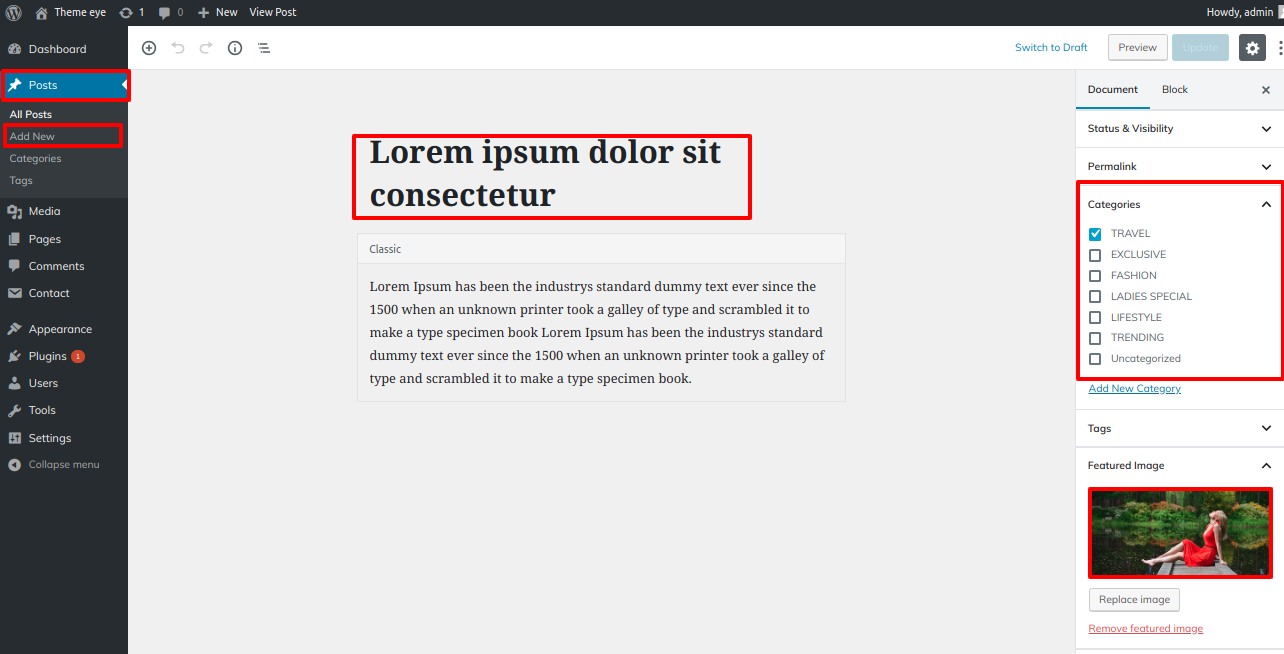
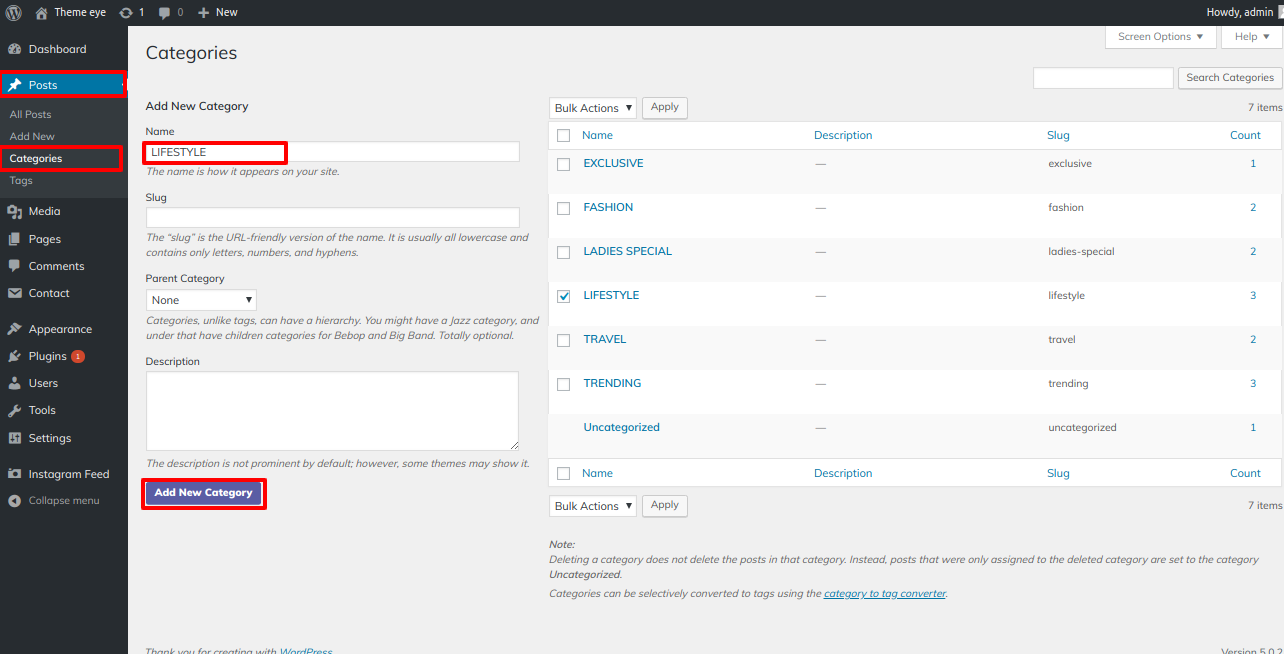
First need to create the Categories
- Step 1 - Go to Dashboard >> Post >> Categories >> Add New
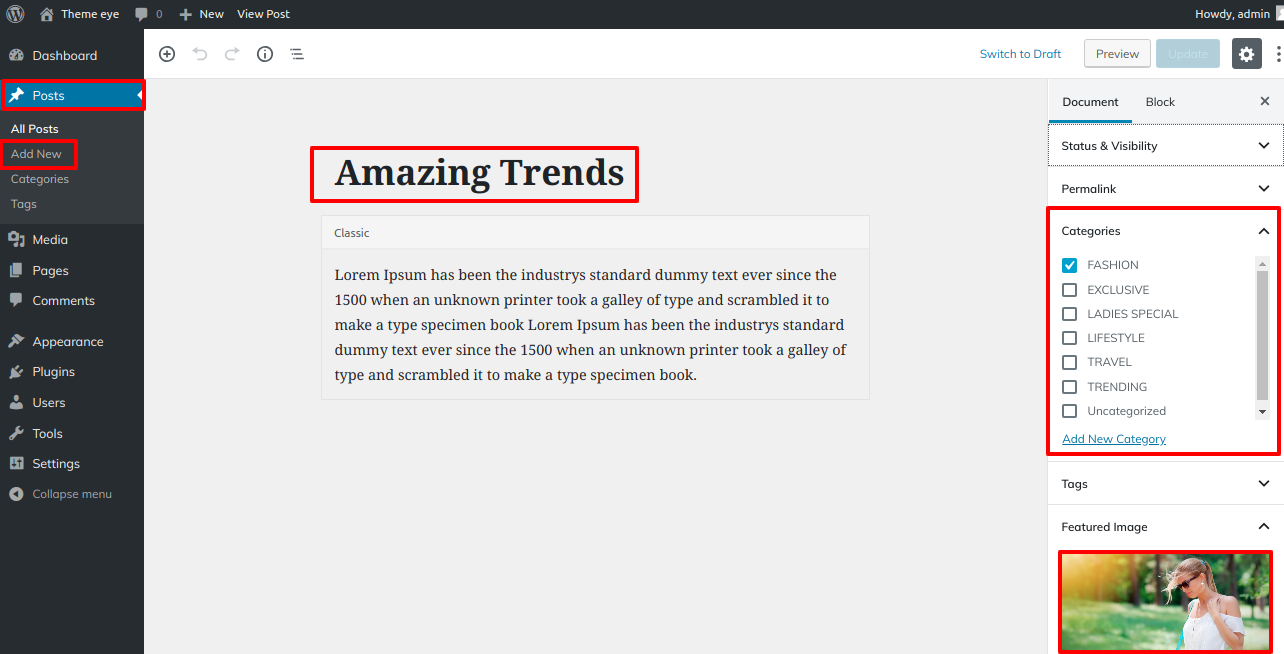
- Step 2 - Go to Dashboard >> Post >> Add New Post
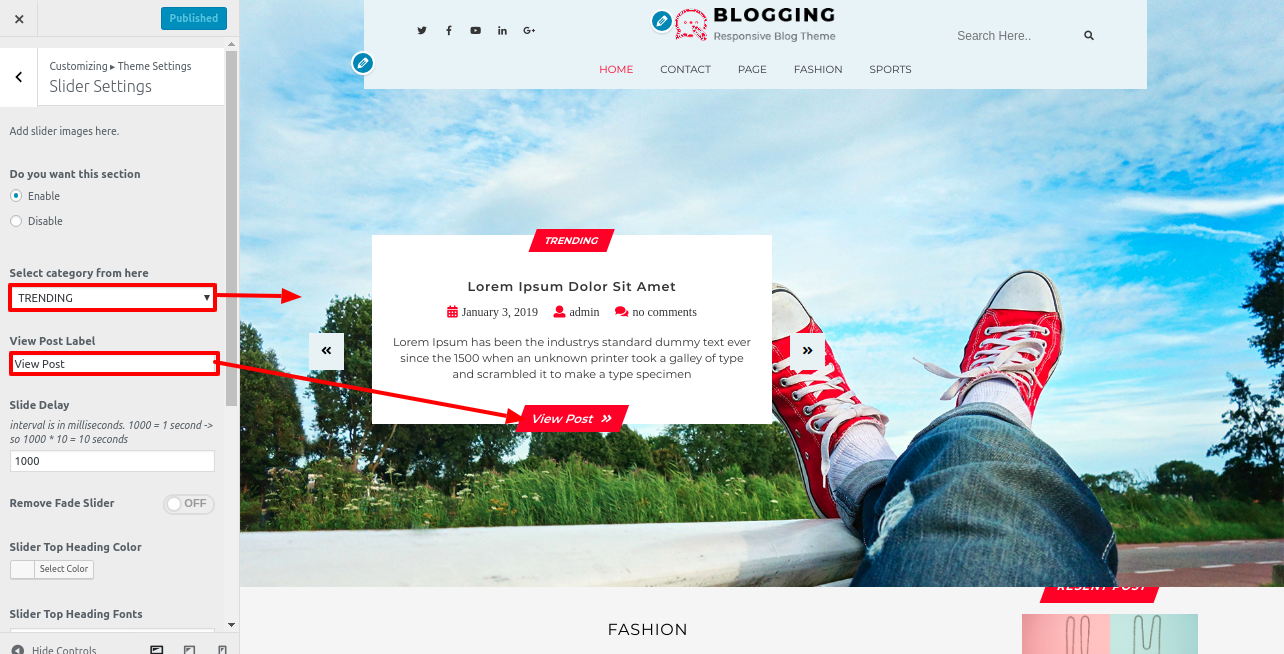
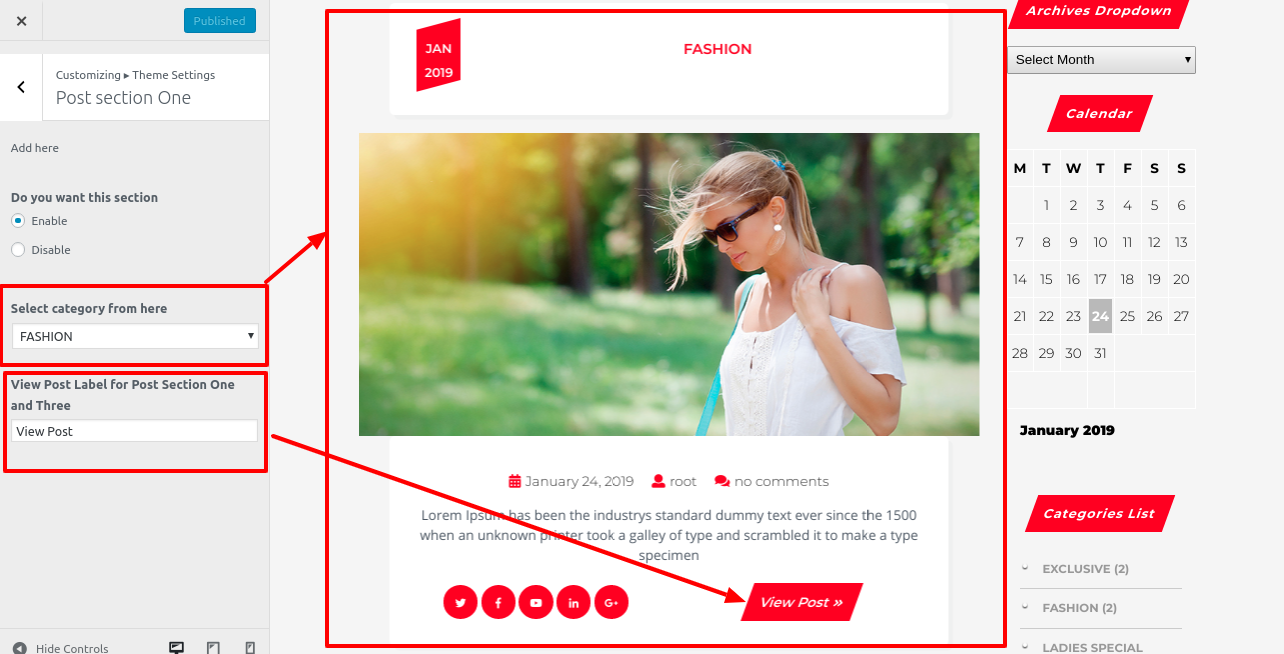
- Step 3 - Go to Dashboard >> Appearance >> Customize >> Theme Settings >>Post section One Step 4 - Do you want the following section: Includes Post section One display enable / disable settings.
- (b) Select category from here
- (c) View Post Label
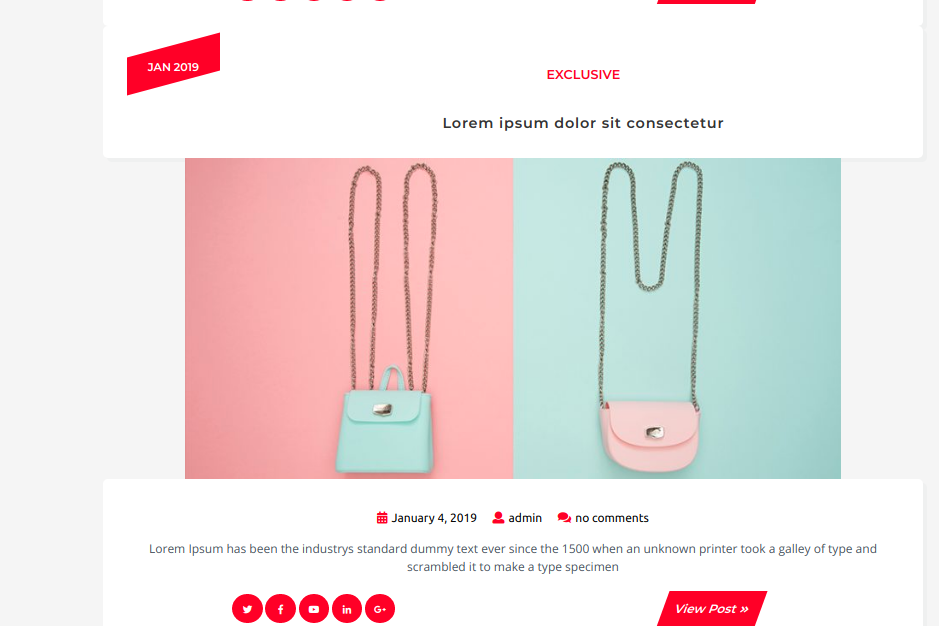
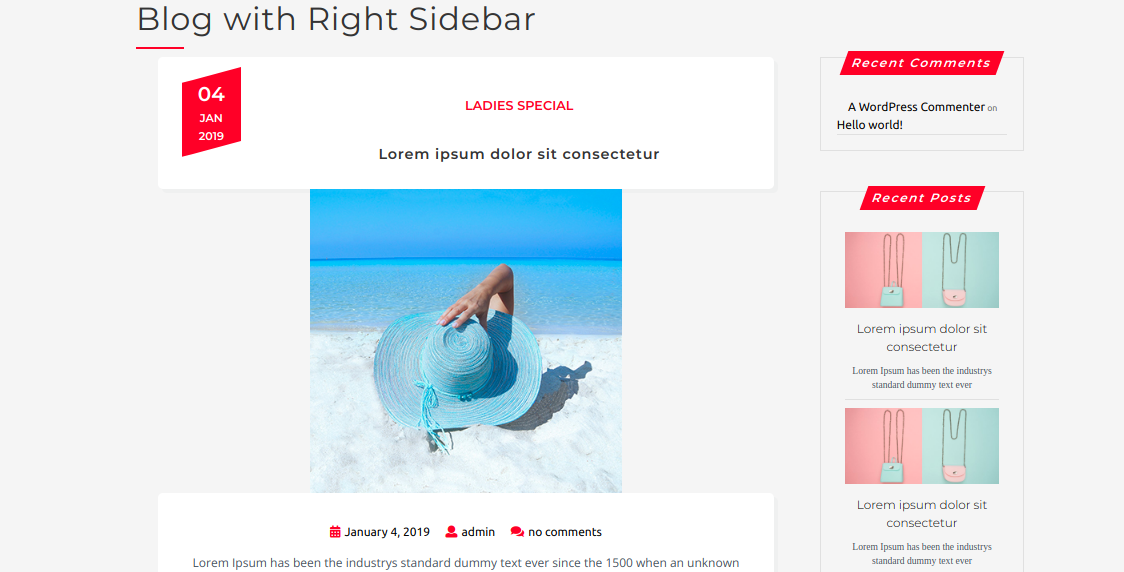
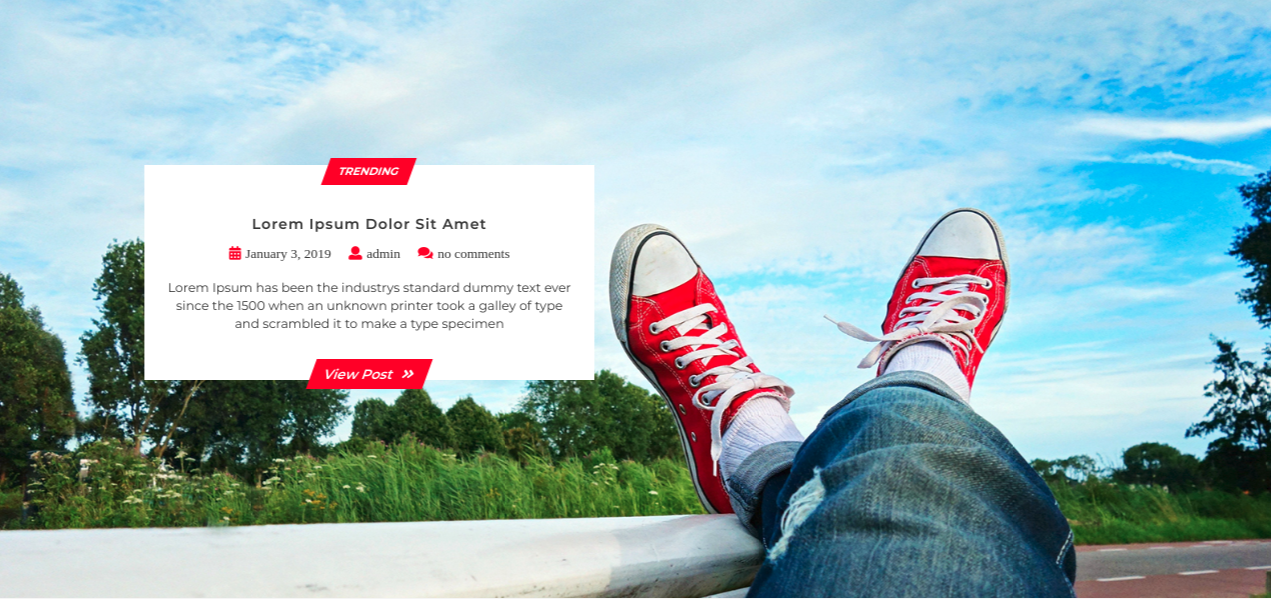
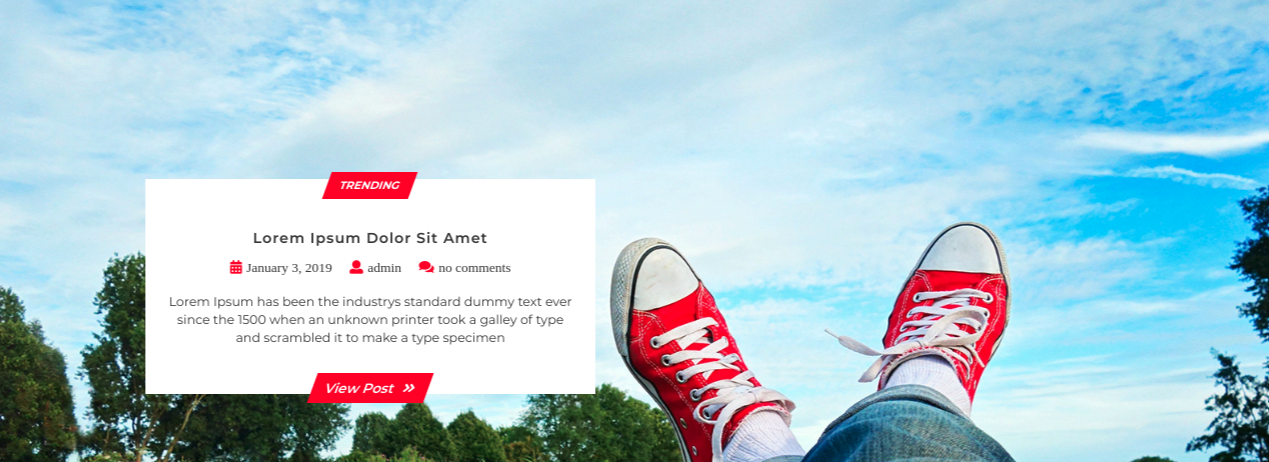
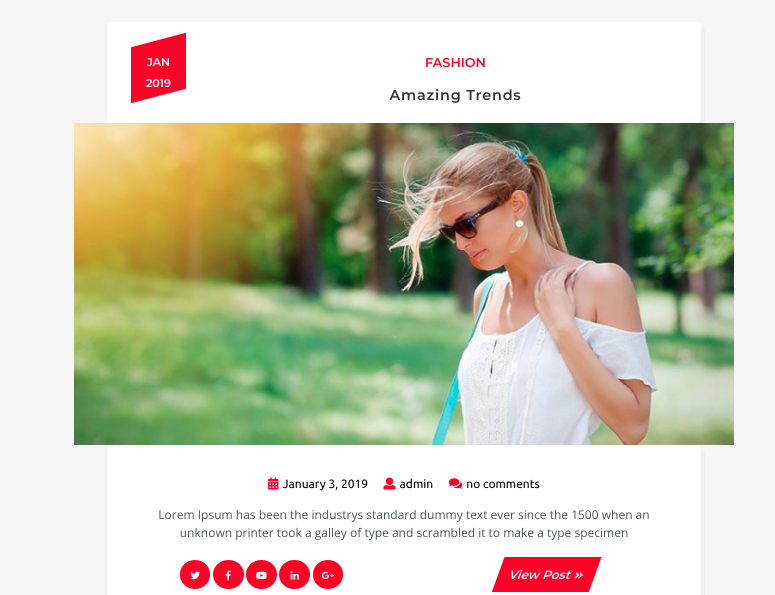
Final display of First Post section
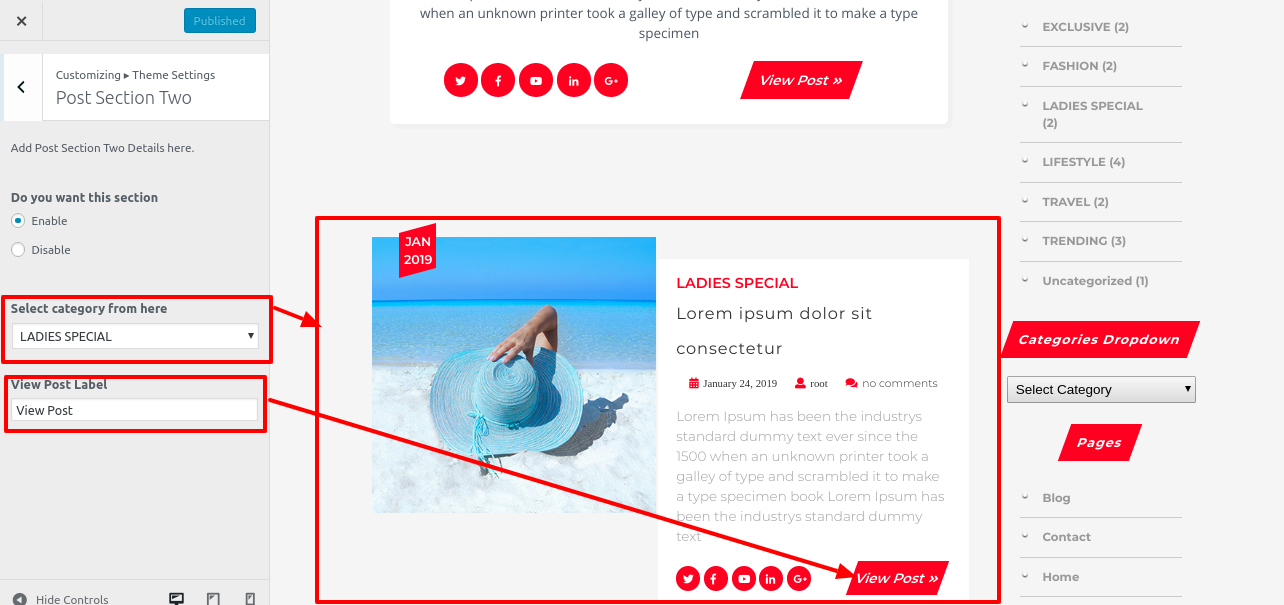
Setup Post Section Two
-
In order to proceed with this sections.
First need to create the Categories
- Step 1 - Go to Dashboard >> post >> Add New >> Categories
- Step 2 - Go to Dashboard >> post >> Add New
- Step 3 - Go to Dashboard >> Appearance >> Customize >> Theme Settings >>Post Section Two
- (a) Do you want this section :Includes settings Post Section Two display enable / disable option.
- (b) Select category from here
- (a) View Post Label
- (c) Click Publish Button

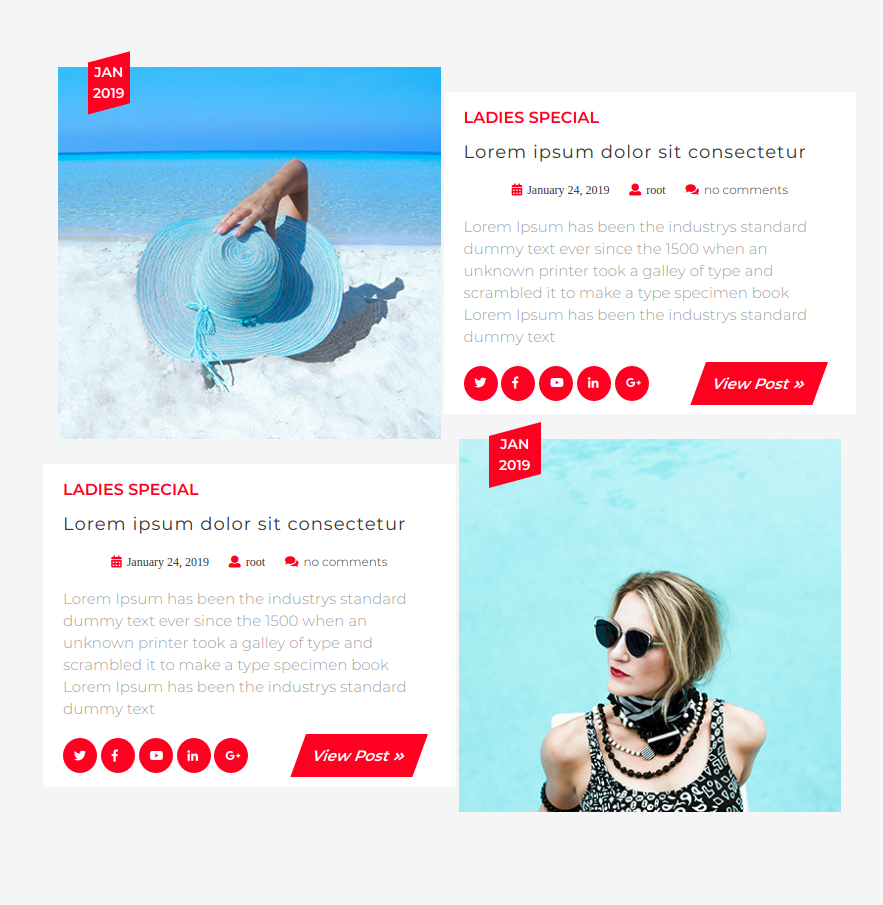
Final display of Post Section Two.
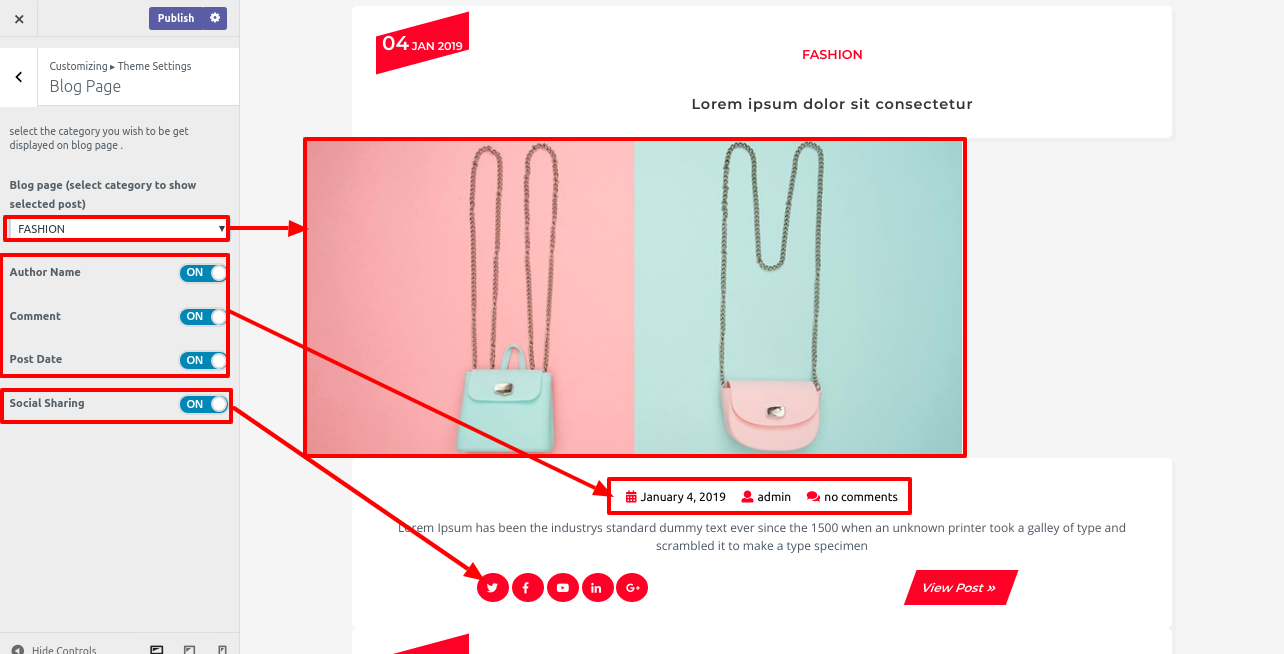
Setup Post Section Three
-
In order to proceed with this sections.
First need to create the Categories
- Step 1 - Go to Dashboard >> post >> Add New >> Categories
- Step 1 - Go to Dashboard >> post >> Add new >>
- Step 3 - Go to Dashboard >> Appearance >> Customize >> Theme Settings >> Post Section Three Step 4 - Doyou want this section :Includes settings for post Section Three display enable / disable option.
- (b) Select category from here
- (c) Click Publish Button
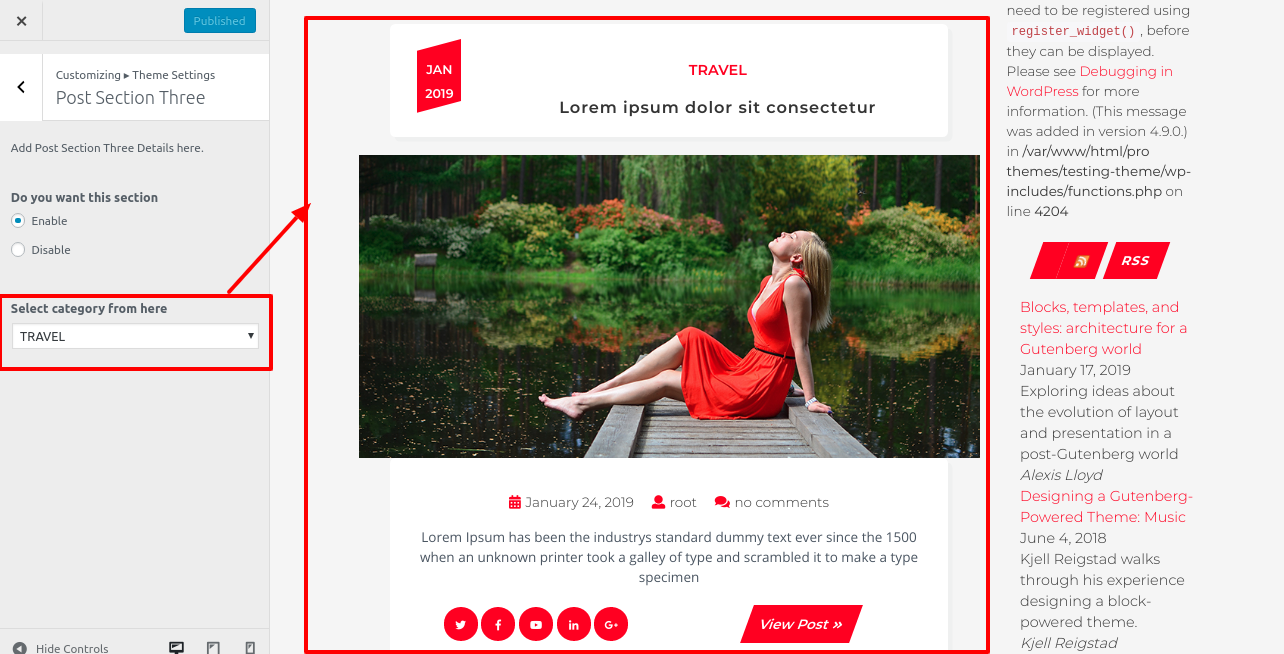
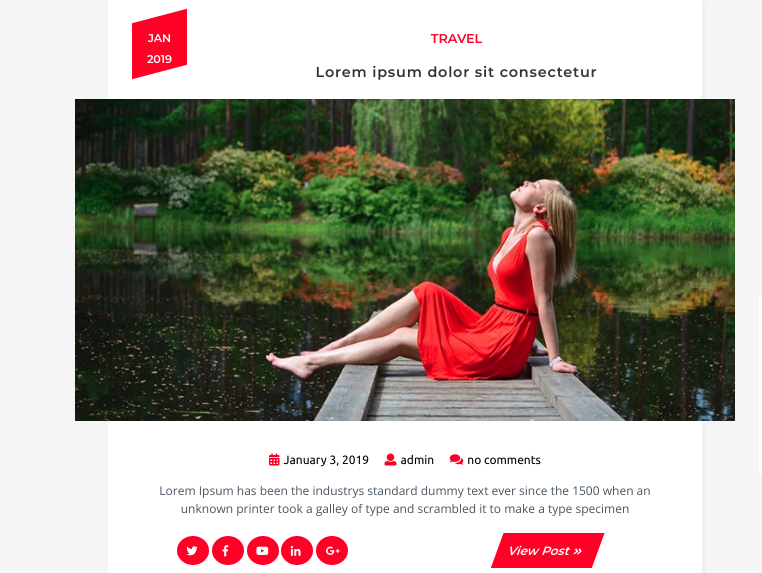
Final display of Post Section Three
Setup Post Section Four
-
In order to proceed with this sections.
First need to create the Categories for Categories
- Step 1 - Go to Dashboard >> post >> Add New >> Categories
- Step 1 - Go to Dashboard >> post >> Add new >>
- Step 3 - Go to Dashboard >> Appearance >> Customize >> Theme Settings >> Post Section Four Step 4 - Do you want this section :Includes settings for Post Section Four display enable / disable option.
- (b) Select category from here
- (c) Click Publish Button
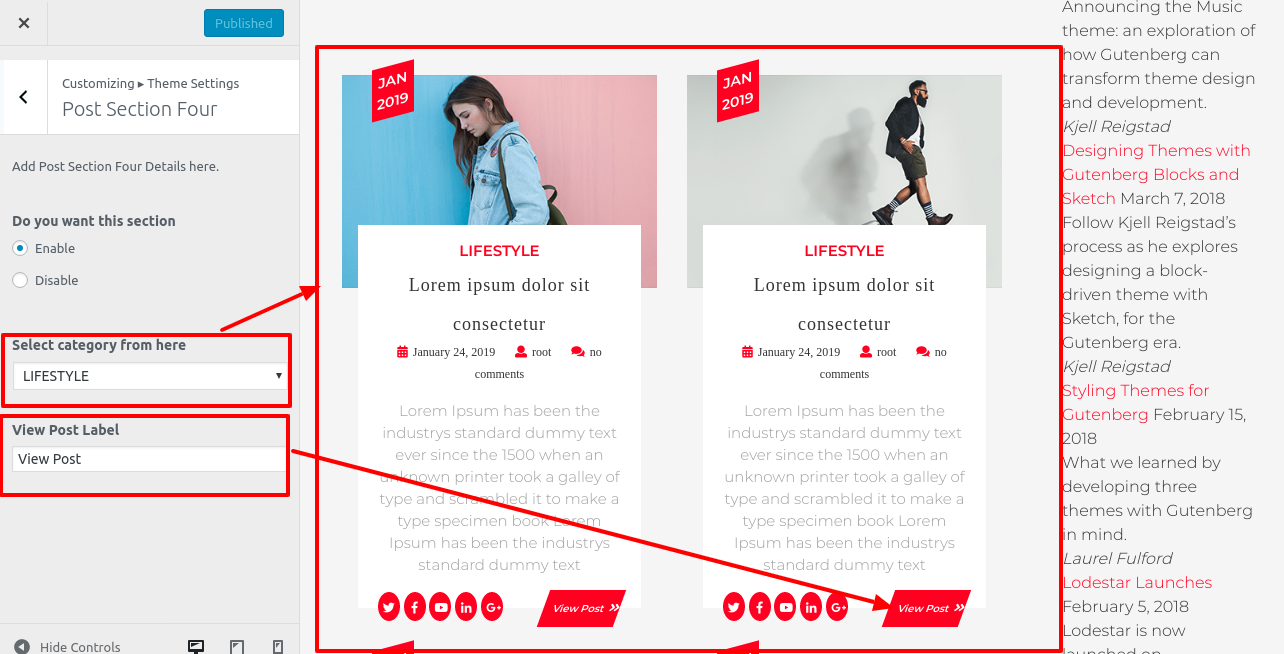
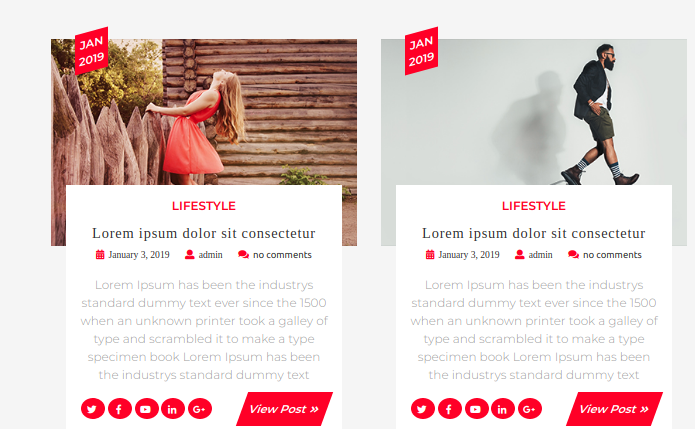
Final display of Post Section Four
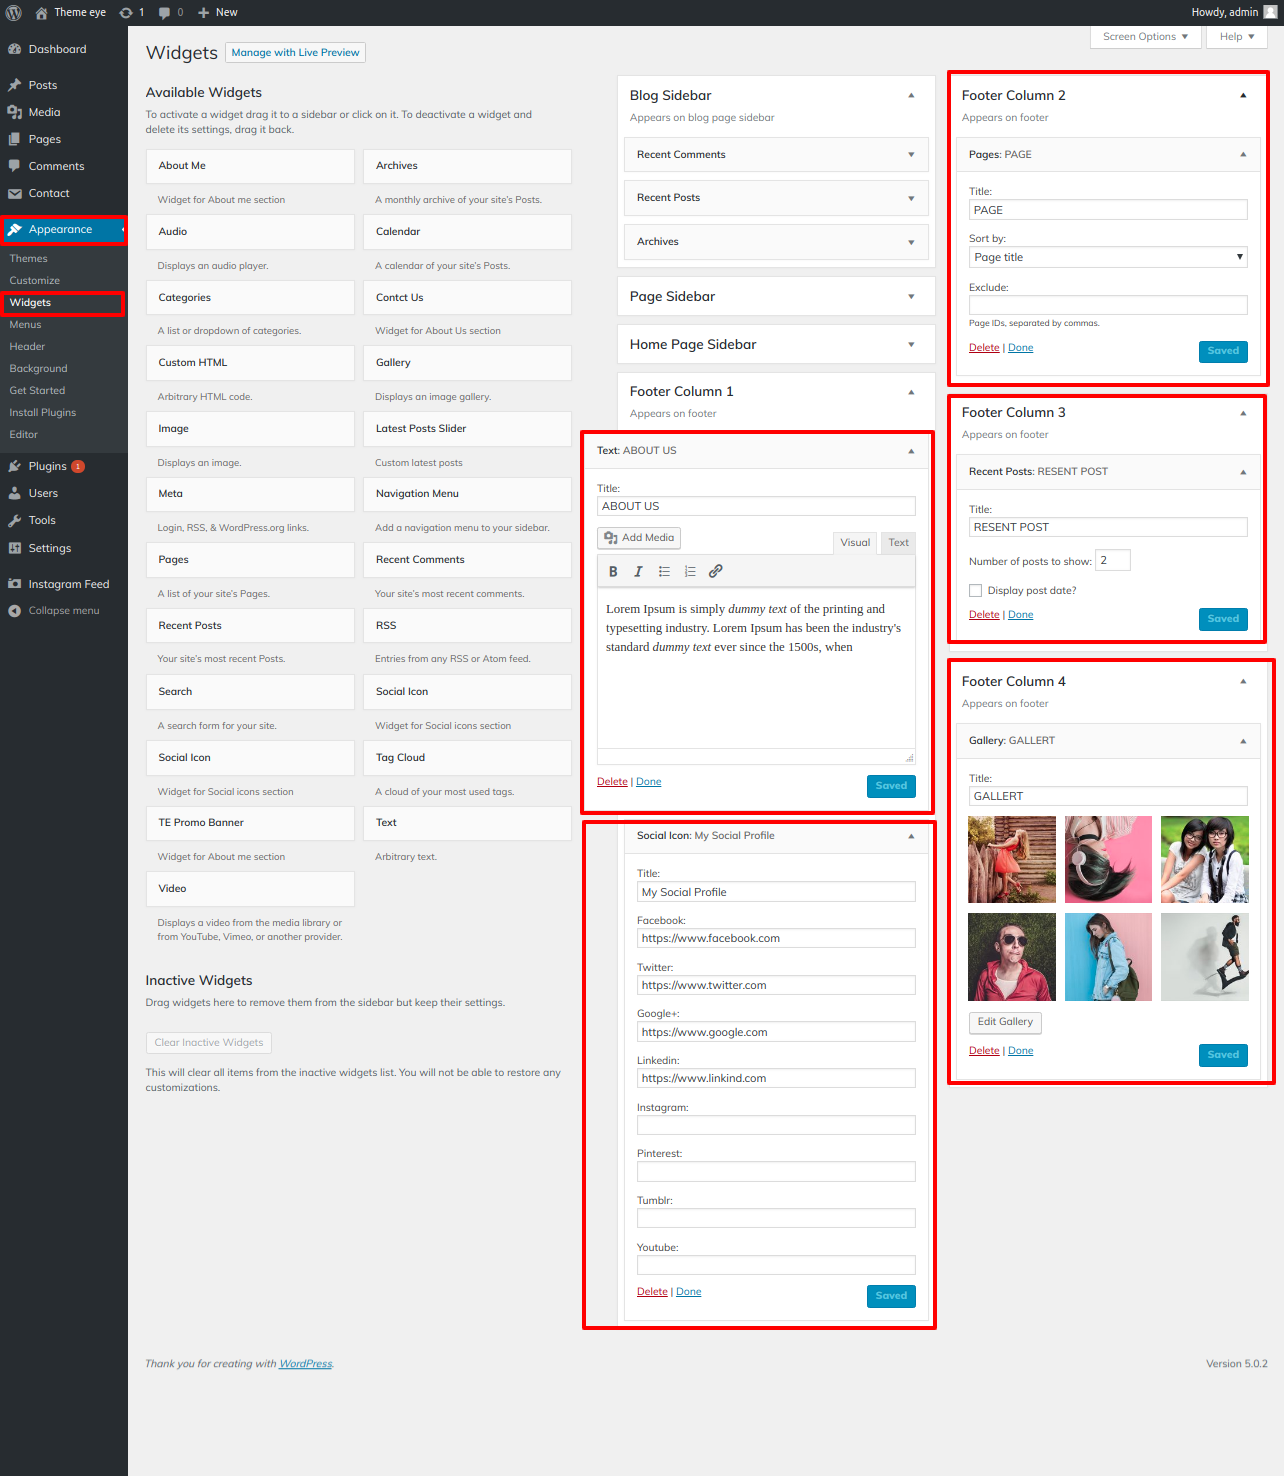
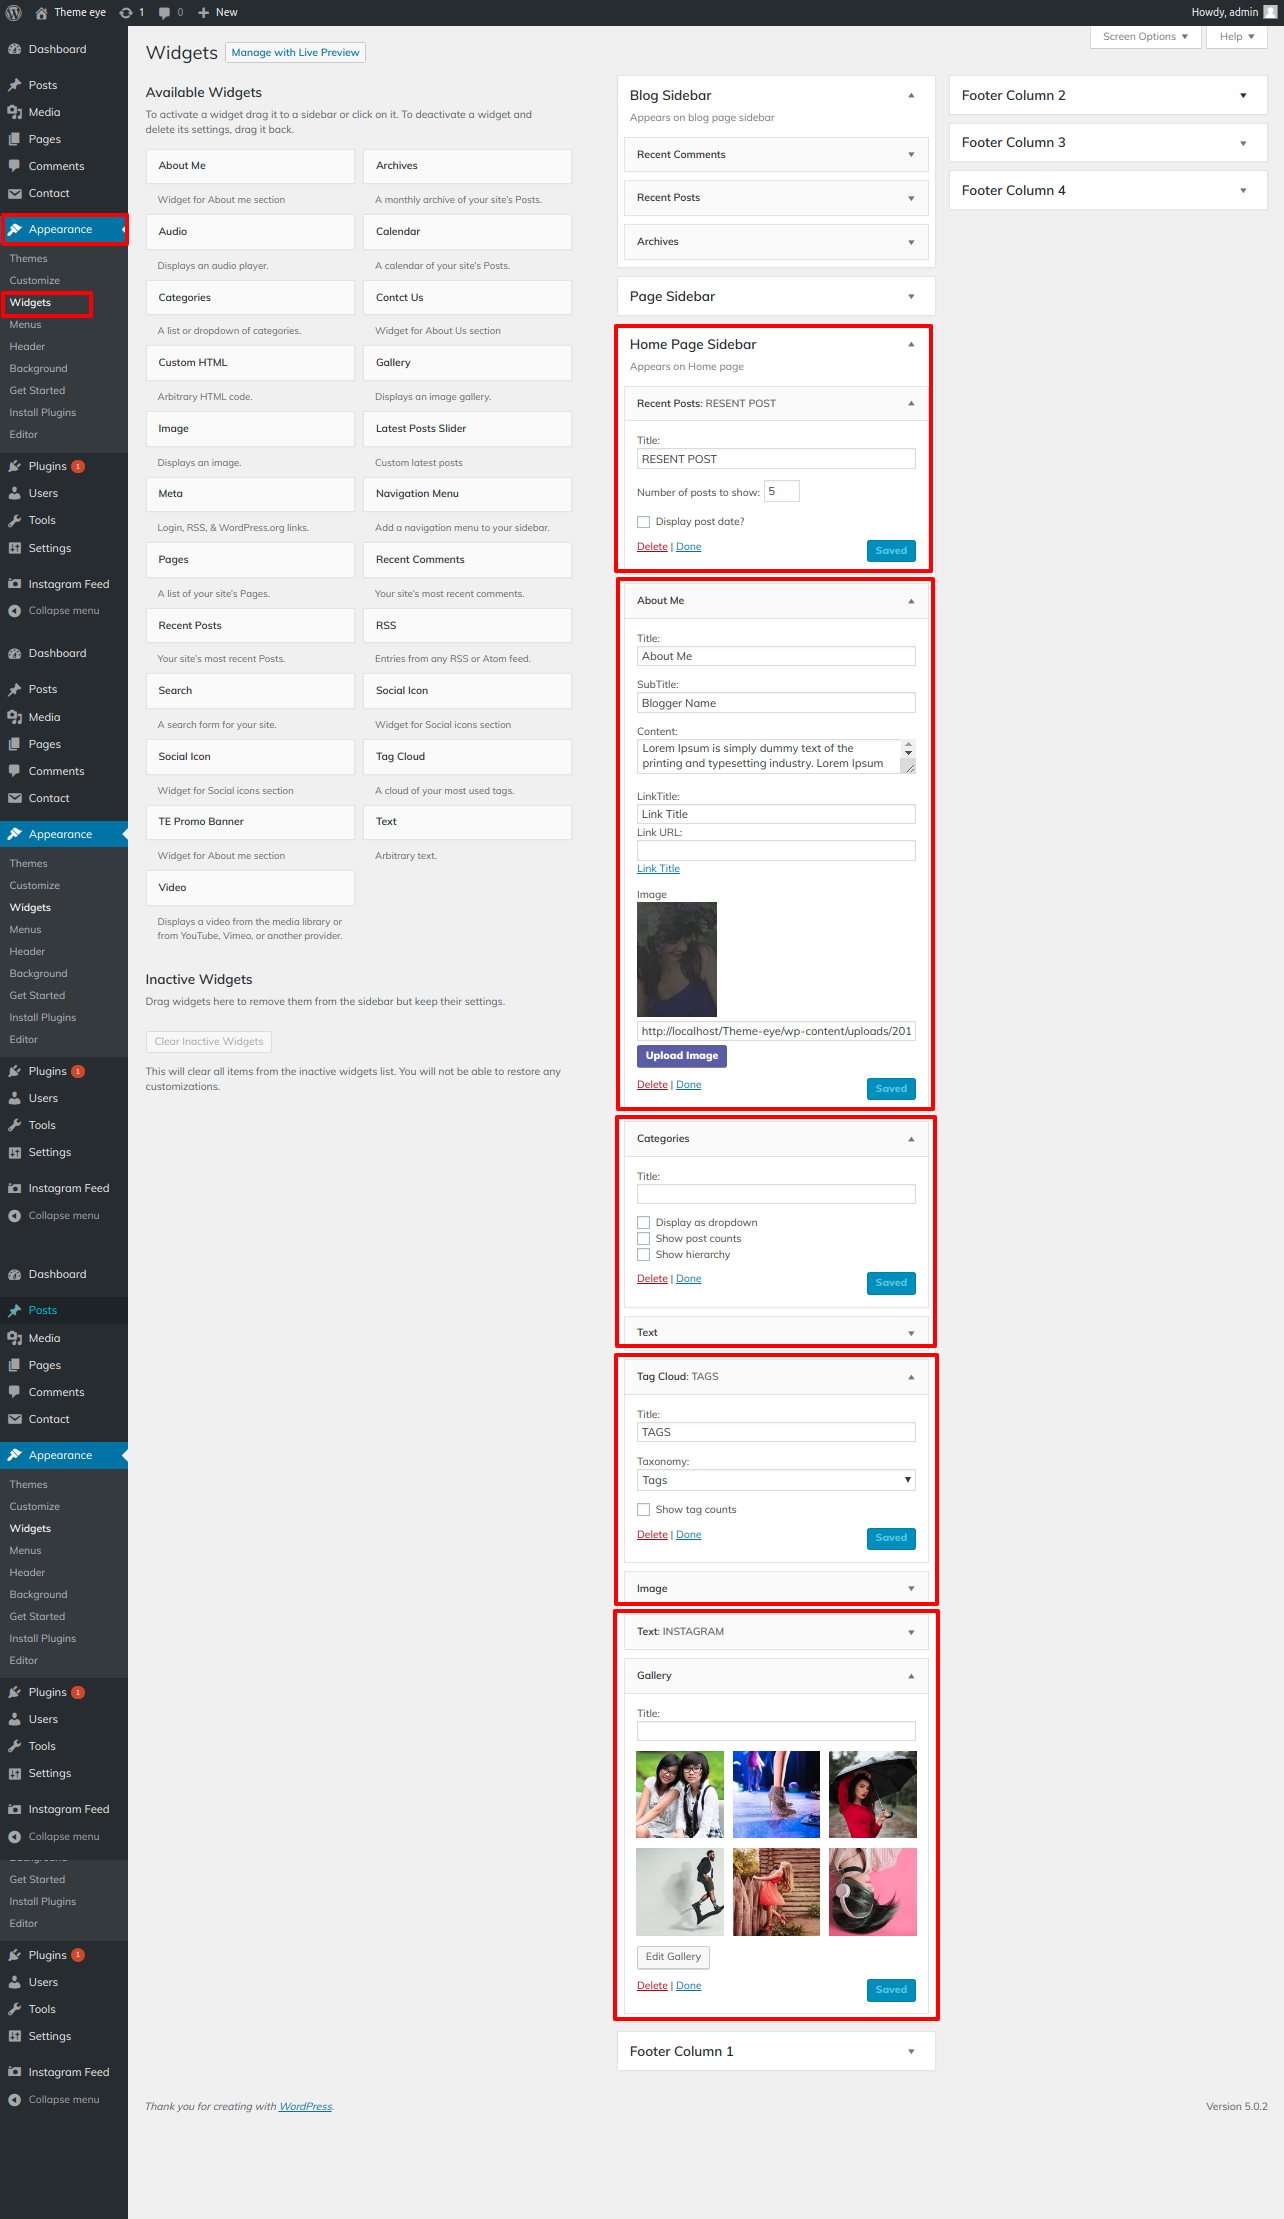
Setup Home page widgets section
- Step 1 - Go to Dashboard >> Appearance >> Widgets >>Home page sidebar
- Step 2. Select Home page sidebar
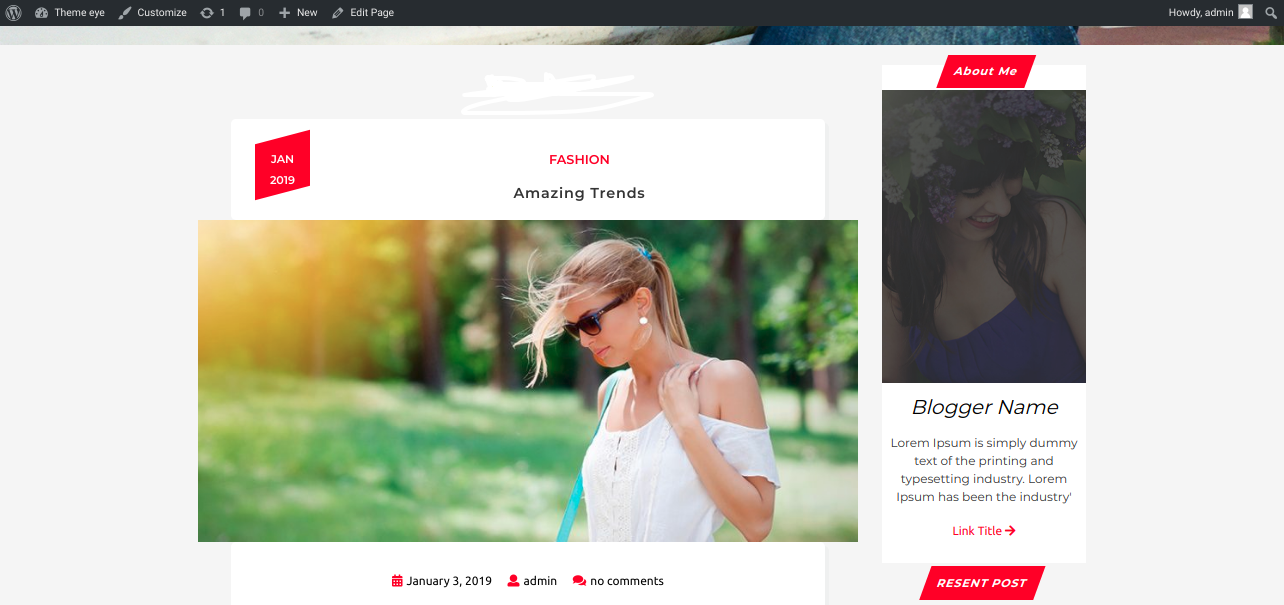
- (a) About me
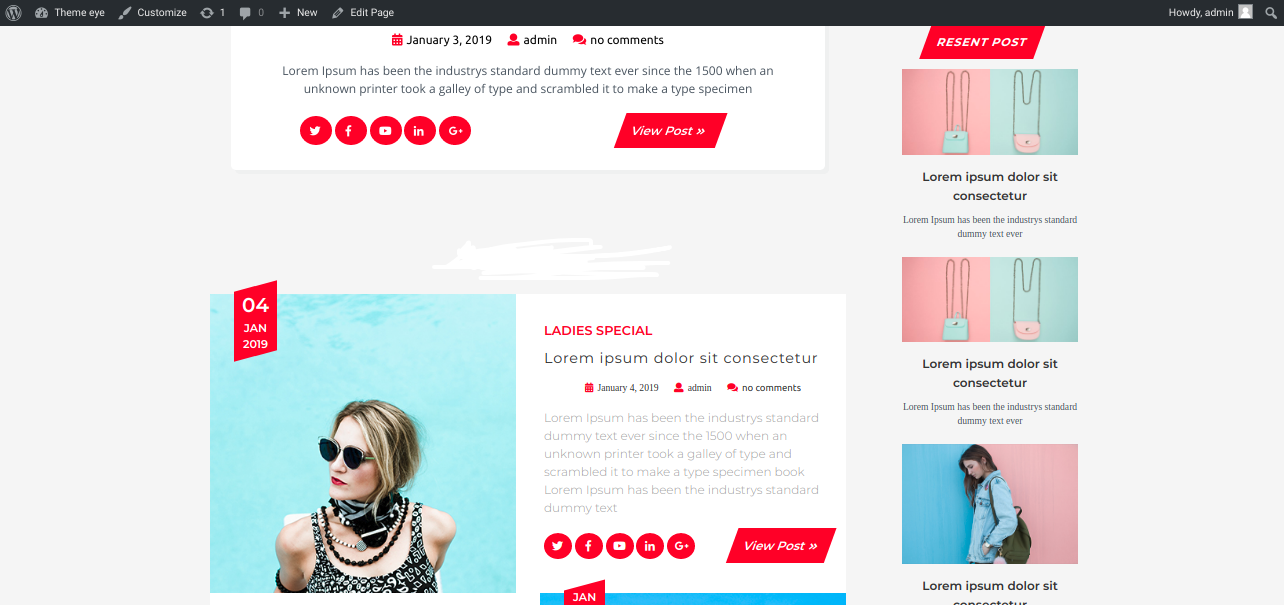
- (b) Resent post
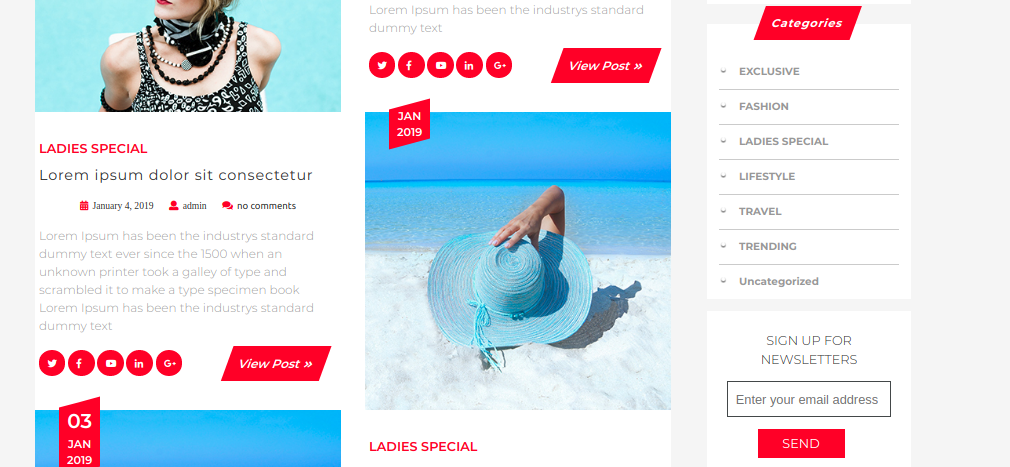
- (c) Categories
- (d) TAGS
- (d) Instagram
- (ii) Click on "save" button
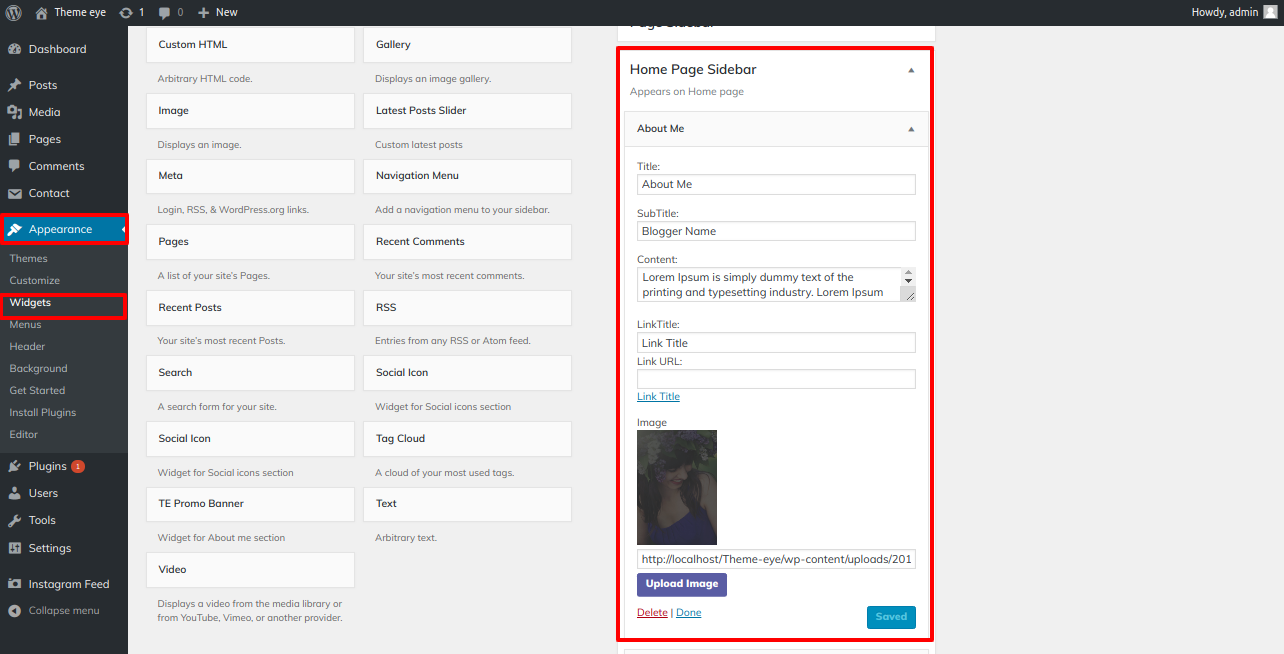
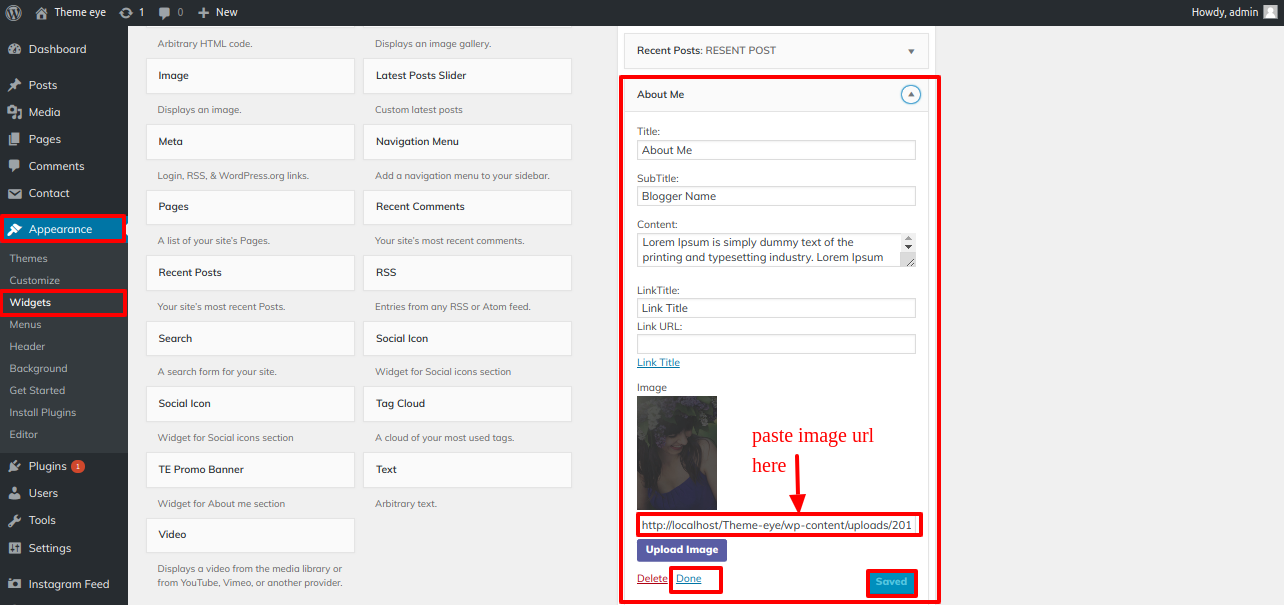
- Setup About Me
- Step 1 - Go to Dashboard >> Appearance >> Widgets >>Home page sidebar
- Step 1. Select Home page sidebar
- (a) About me
- Setup Recent post
- Step 1 - Go to Dashboard >> Appearance >> Widgets >>Home page sidebar
- Step 1. Select Home page sidebar
- (a) Resent post
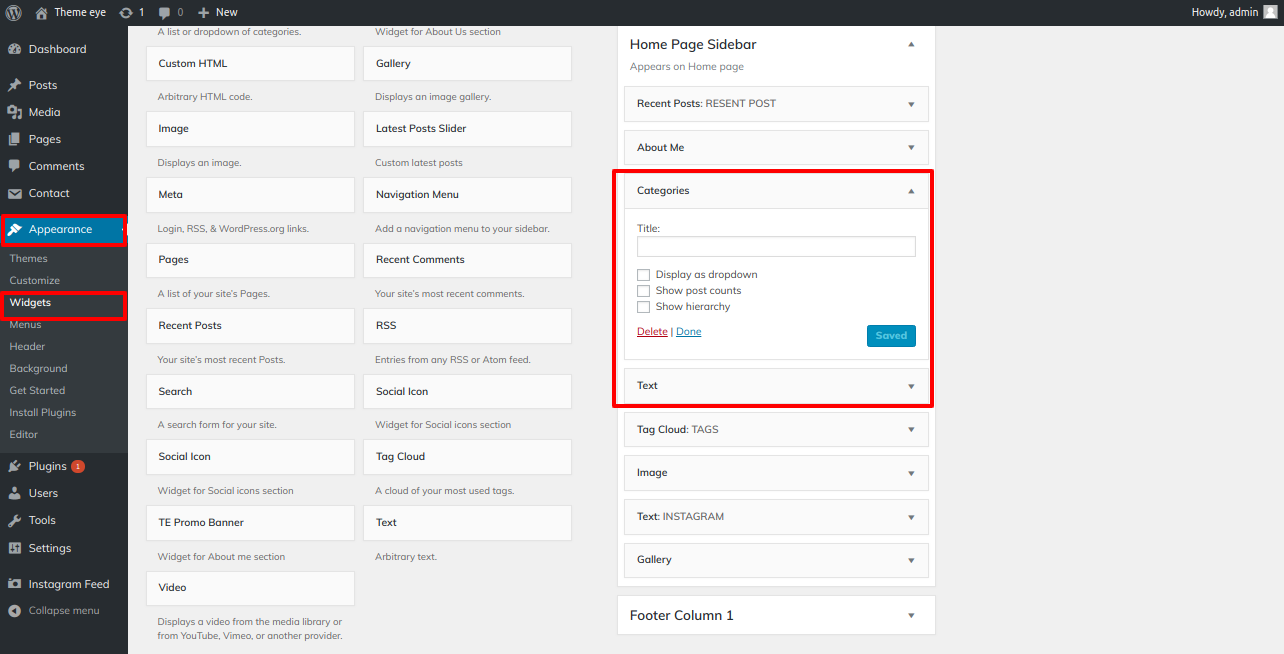
- Setup Categories
- Step 1 - Go to Dashboard >> Appearance >> Widgets >>Home page sidebar
- Step 1. Select Home page sidebar
- (a) Categories
In order to procced with this section,

Setup Instagram Section
-
To get started with Instagram, you must first install the Instagram feed plugin.
The Instagram feed option will appear on the dashboard after installation.
- Step 1 - Go to Dashboard >> Instagram Feed >> configure
You can customise the number of columns, photos, and padding around images.
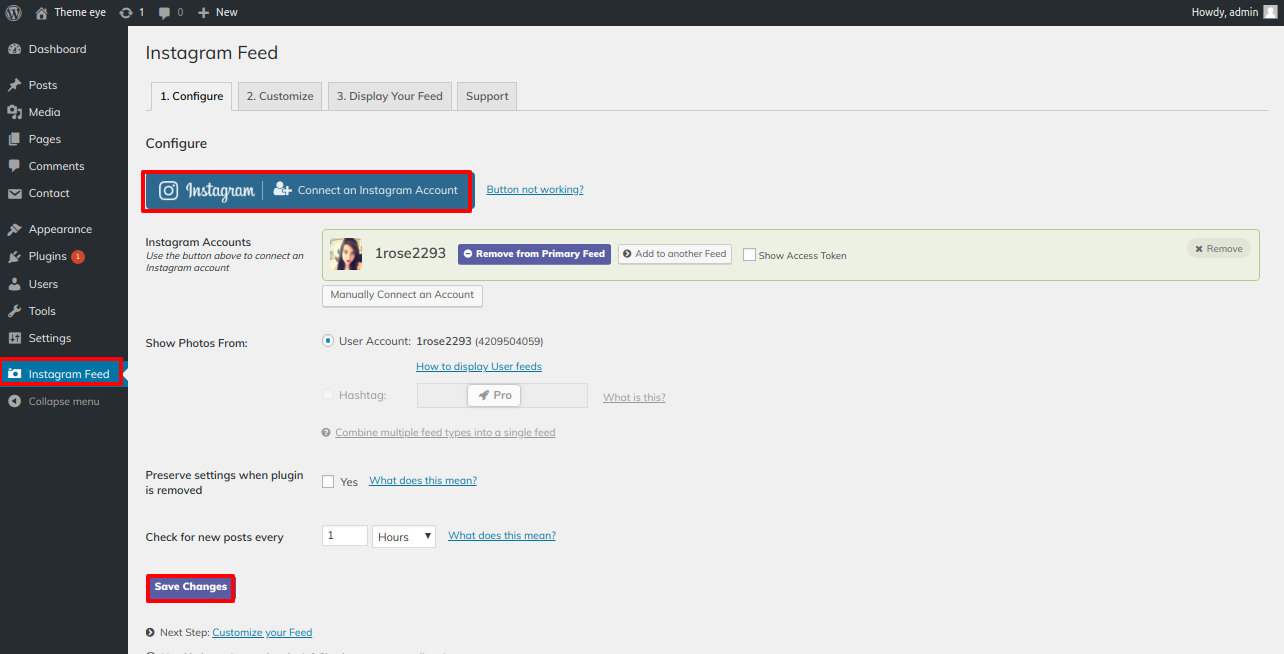
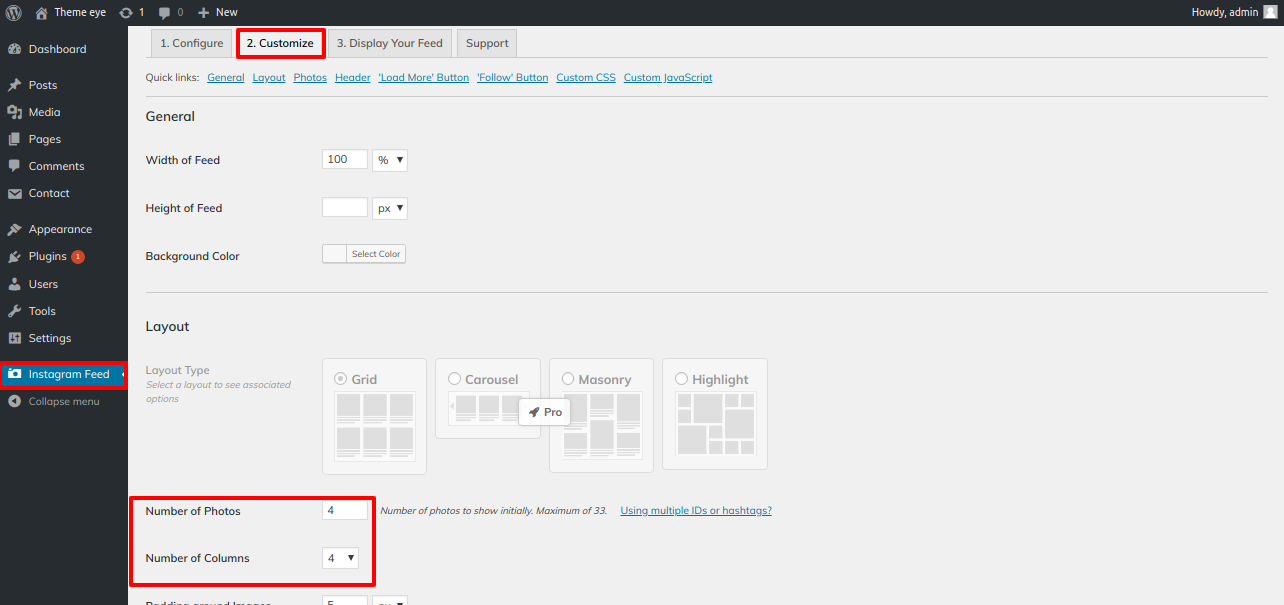
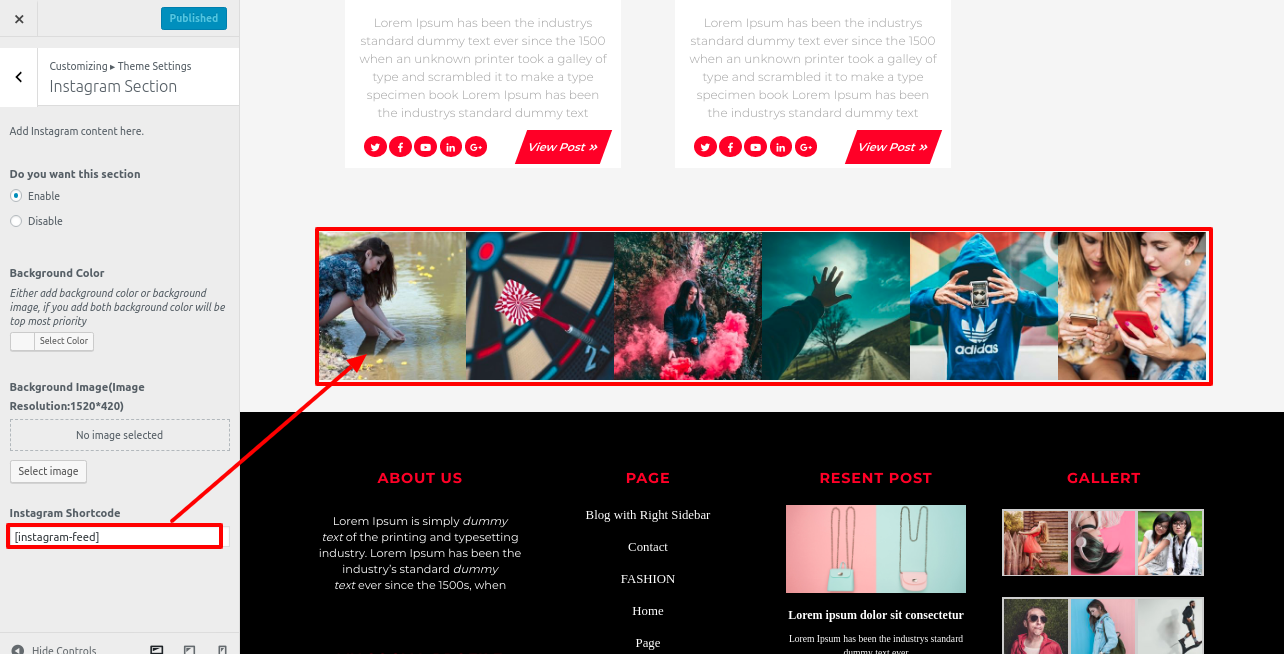
Final display of Instagram Section

Setup Social Icon Section
- Step 1 - Setup Social Icon Section
- Go to Appearance >> Customizing >> Theme Settings >> Social Icons.
- Social Icon Front Preview
- If you have Social Icons on the top bar and footer sections, you cannot set all social icons from the Social Icon Section to appear on the top bar and footer.